EditLive! provides support for the use of Cascading Style Sheets (CSS) to enforce formatting standards easily by separating content from formatting. Styles can be specified three ways: via an external, linked style sheet; through an embedded style sheet; or through inline style information (e.g. in a <SPAN> tag). This article assumes the reader is familiar with the concept of using Cascading Style Sheets. If you would like to learn more about CSS before reading this document, please visit the W3C's Introduction to CSS.
Style Types
EditLive! provides several methods of adding style information to a document. Furthermore, EditLive! recognizes style information and populates the style drop-down list box accordingly. EditLive! can apply styles both as inline styles and block styles. Block styles are applied to an entire XHTML element such as a <P> tag, whereas inline styles are applied to a section of text within a XHTML element.
Specifying Block Styles
The way in which styles are specified within a style sheet affects the way they can be applied within EditLive!. Style classes which are directly associated with a block tag can only be applied to a block tag. These styles are designated by a ¶ symbol on the styles drop-down in EditLive!. For example, a block style which defines that paragraph text should be blue can be defined as follows:
p.blue{color: blue}
Specifying Inline Styles
Inline styles in EditLive! are applied using the <SPAN> XHTML element. Thus, a style which can only be used inline should be defined as a class to be used with the <SPAN> tag. These styles are designated by a mark on the styles drop-down in EditLive!. An inline style which would specify text that is to have a red color would be as follows:
span.redtext{color: red}
Specifying a Block and Inline Style
Finally, it is possible to define a style class which may be used as both an inline and block style. These styles appear twice on the EditLive! styles drop-down - once marked with the ¶ symbol, and again with an a mark. A style class which could be applied on both block and inline tags to change the text color to green is as follows:
.green{color: green}
User Friendly Style Names
EditLive! will attempt to display a more user friendly name of the defined CSS classes in the styles drop down. If the style name contains hyphens, underscores or uses camel-case naming convention the name will be displayed using spaces instead of the hyphen or underscore or split using spaces for camel case.
Example
- "p.strong-emphasis" will become "Paragraph (Strong Emphasis)"
- "p.red_blackground" will become "Paragraph (Red Background)"
- "p.blueText" will become "Paragraph (Blue Text)"
Setting Styles in EditLive!
Style information for EditLive! can be set using the following methods:
- Using the EditLive! Configuration File to Set Styles
A configuration file may include style information in the <head> element in a couple of ways:
With the exception of inline styles, style information specified through the use of a configuration file takes precedence over style information specified in any other way.
- Importing Styles From Microsoft Word
Microsoft Word Styles can be imported from a Microsoft Word document using simple copy and paste. This action is permitted using the <wordImport> element.
- Setting Styles Via the EditLive! Document Load Time Property
Styles may be specified as part of the <head> tag of a HTML document when using the setDocument Method to set the content of EditLive!.
- Setting Styles via the EditLive! SetStyles Load Time Property
The setStyles Method can be used to explicitly set style information. It should be noted that EditLive! CSS support complies with the W3C CSS precedence rules. Thus, inline styles take precedence over an embedded style sheet. Furthermore, the styles listed in an embedded style sheet take precedence over those from an external style sheet. Finally, when multiple external style sheets are used, style sheets listed last will have precedence if there are any conflicts between style sheets.
If embedded styles are specified using the a configuration file, the embedded styles specified will be the only embedded styles to exist in the XHTML.
Example
If the configuration file specifies
H1{font-size: 10;}
and the setStyles Method for an instance of EditLive! specifies
H1{font-size: 20} H2{font-size: 15}
, then the resulting embedded styles for the XHTML will still only be
H1{font-size: 10}
.
Inline styles will still exist for any single tag specified.
Example
If the XHTML specified with an instance of EditLive! contains <span style="color: yellow">Yellow Text</span> then this style will still exist for the specified tag.
Using the EditLive! Configuration File to Set Styles
Linking to an External Style Sheet
EditLive! can be configured to use external style sheets by specifying a value with the <link> element in the configuration file.
Example
Linking to the stylesheet mystyles.css, located in the same directory as the HTML page implementing this configuration file, will specify that specific style sheet to be used.
<editLive>
   <document>
      <html>
         <head>
            <link href="mystyles.css" rel="stylesheet" type="text/css"/>
         </head>
      </html>
   </document>
   ...
</editLive>
When EditLive! links to multiple style sheets, the last style sheet added will have priority if there is a conflict with an earlier style sheet.
Example
stylesheet1.css defined H1 as:
H1{font-family: Arial, Helvetica, sans-serif; font-size: 24pt;}
stylesheet2.css, linked after stylesheet1.css, defined H1 as:
H1{font-family: Arial, Helvetica, sans-serif; font-size: 48pt; }
The value of H1 in stylesheet1.css would be overridden by the H1 value given in stylesheet2.css (i.e. H1 would be size 48pt, not 24pt). Hence, the order that style sheets are added is important and will effect how the HTML is formatted.
Defining an Embedded Style Sheet
An embedded style sheet can specified through the <style> element of the EditLive! configuration file. Styles listed in a style sheet embedded via the configuration file take precedence over styles otherwise defined.
Example
The following would configure EditLive! to use the provided embedded style sheet. The embedded style sheet used for this example would implement a mixture of inline and block styles.
<editLive>
   <document>
      <html>
         <head>
            <style>
               <!--
               p.blue{color: blue;}
               span.red{color: red;}
               .green{color: green;}
               -->
            </style>
         </head>
      </html>
   </document>
</editLive>
Importing Styles from Microsoft Word
Styles may be easily imported from Microsoft Word. This action is performed by copying text from Microsoft Word and selecting paste in EditLive!.
Developers can customize the manner in which EditLive! copies styles from Microsoft Word using the <wordImport> configuration file element. EditLive! provides three different methods for copying styles from Microsoft Word:
- Clean - Copying content from Microsoft Word, adding no style information,
- Merge Embedded - Style information is stored in the <head> of the document with other embedded styles, and
- Merge Inline - Style information is explicitly specified inline for text copied.
In cases where EditLive! uses the configuration file to specify embedded styles, users should copy text and styles from Microsoft Word using Merge Inline. The reason for this is that embedded styles specified in a configuration file override all other embedded styles specified for the XHTML, including styles copied from Microsoft Word.
Setting Styles via the Document Load Time Property
When instantiating an instance of EditLive!, the setDocument Method can be used to populate the editor with a complete HTML document. An embedded style sheet can be specified in the head of this document.
Example
To create an embedded style sheet specifying H1 to be of font size 20pt, the following methods of EditLive! would be called:
<script src="../../redistributables/editlivejava/editlivejava.js" language="JavaScript"></script>

<script language="JavaScript">
  var editlivejava1;
  editlivejava1 = new EditLiveJava("ELJApplet1", 700, 400);
  editlivejava1.setLocalDeployment(false);
  editlivejava1.setXMLURL("eljconfig.xml");
  editlivejava1.setDocument(encodeURI("<html><head><style><!--H1{FONT-SIZE: 20pt;}--></style></head><body><h1>Testing Header Size</h1></body></html>"));
  editlivejava1.show();
</script>
Any embedded style sheets defined in the EditLive! configuration file take precedence over those defined with the Document property.
Setting Styles via the Styles Load Time Property
Styles can be directly provided to EditLive! when it is instantiated. This is achieved by setting the setStyles Method of EditLive!. Styles defined in this manner act as an embedded style sheet within EditLive!.
Example
If the setStyles Method or attribute was set to be:
editlivejava1.setStyles(encodeURI("H1 { FONT-SIZE: 36pt; }"));
then the information would appear in EditLive! for Java's Code View as:
<HEAD>
   ...
   <STYLE>
      <!--
      H1 { FONT-SIZE: 36pt; }
      -->
   </STYLE>
   ...
</HEAD>
Any embedded style sheets defined in the EditLive! configuration file take precedence over those defined with the Styles property.
Populating the Styles Drop-Down List Box
The styles drop-down box appearing on the EditLive! will render based on the following conditions:
- The EditLive! Configuration File needs to specify a <toolbarComboBox> element with a name attribute containing the string Style. Each <comboBoxItem> child element in <toolbarComboBox> will define the tag types the user can insert.
- The actual CSS loaded into EditLive! uses the methods outlined in Setting Styles in EditLive!.
Example
A stylesheet loaded into EditLive! defines the following styles:
h1{color: yellow}
p.blue{color: blue}
span.red{color: red}
.green{color: green}
The EditLive! Configuration File used features the following <toolbarComboBox> element:
<toolbarComboBox name="Style">
       <comboBoxItem name="P" text="Normal"/>
       <comboBoxItem name="H1" text="Heading 1"/>
</toolbarComboBox>
The following would appear in the drop-down styles list box:
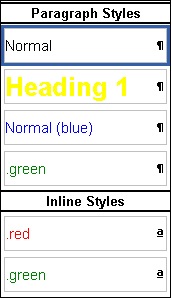
.green class appears twice as it can be applied as both an inline and a block style.
<comboBoxItem> Configuration File elements can use the text attribute to create an alias for the Style type. In the example above, you can see that H1 tags appear as Heading 1 instead of H1. For more information on creating aliases for styles, see the <comboBoxItem> article.
Styles Drop-Down Hierarchy
The styles drop down displays available styles according to where the cursor has been inserted. It will display styles in the following order:
- Paragraph Styles (e.g. P tag, Heading tags)
- Inline Styles (e.g. Span tags )
- Element Styles (styles available to the current element selected)
- Parent Element Styles (styles for each parent element of the currently selected element).
Example
The following HTML is loaded into EditLive!:
<h1>Table Example</h1>
<table>
       <tr>
               <td>Cell 1</td>
               <td>Cell 2</td>
       </tr>
</table>
If the user selected the text Cell 1, the style drop-down would display the following available styles:
- Paragraph Styles
- Inline Styles
- Cell Styles
- Row Styles
- Table Styles
Styles will appear under their defined type (e.g. paragraph, inline, element) in the following hierarchy:
- Default element styles (e.g. h1)
- All element specific CSS class (e.g. h1.h1Style)
- All generic CSS classes (e.g. .genericStyle)
The order by which default element styles, element specific styles, and generic styles are arranged will depend on the order in which these styles appear when passed to EditLive!.
Example
A stylesheet loaded into EditLive! defines the following styles:
p.blue{color: blue}
p.yellow(color: yellow}
.green{color: green}
.brown(color: brown)
The Styles drop-down will first render the default element styles (i.e. p.blue, then p.yellow). The generic elements will then be rendered in the order .green then .brown.
Example
A stylesheet loaded into EditLive! defines the following styles:
h1{color: yellow}
p.blue{color: blue}
span.red{color: red}
.green{color: green}
The EditLive! Configuration File features the following <toolbarComboBox> element:
<toolbarComboBox name="Style">
       <comboBoxItem name="P" text="Normal"/>
       <comboBoxItem name="H1" text="Heading 1"/>
</toolbarComboBox>
The following would appear in the drop-down styles list box:
You can see that the default styles for the <P> and <H1> tags appear first. Then CSS class specific to <P> (.blue) appears next. Finally, the generic CSS class .green appears last.
Getting Styles from EditLive!
Style information for EditLive! can be extracted using the following methods:
- Using the getStyles Method.
- Accessing the _styles HTTP Post Attribute
- Using the getDocument Method.
This method returns the entire XHTML Document, including the embedded styles in the <head> tag.
Accessing the _styles HTTP Post Attribute
As documented in the Retrieving Content From EditLive! article, both the HTML content and the CSS styles contained in an instance of EditLive! can be sent through a HTTP Post. When a form containing an instance of EditLive! is submitted, a hidden field containing all style information for the document is also created and posted with the form data. This hidden field will be called ELAppletName_styles, where ELAppletName is the name specified by the developer in the EditLiveJava constructor.
Example
The following example highlights naming an instance of EditLive! ELAppletName.
<script src="../../redistributables/editlivejava/editlivejava.js" language="JavaScript"></script>

<script language="JavaScript">
  var editlivejava1;
  editlivejava1 = new EditLiveJava("ELAppletName", 700, 400);
  editlivejava1.setLocalDeployment(false);
  editlivejava1.setConfigurationFile("eljconfig.xml");
  editlivejava1.show();
</script>
The page listed as the action to receive the HTTP Post could then contain controls to assign the styles information to a variable, which could then be saved to a back-end database.
Example
The page sending the HTTP Post has generated a hidden field called ELAppletName_styles, containing the styles information.
VB Scripting
<%
   Dim stylesInformation = Request( "ELAppletName_styles" )
%>
JSP Scripting
<%
   String stylesInformation = request.getParameter("ELAppletName_styles");
%>
See Also
- Retrieving Content From EditLive!
- <head> Configuration File Element
- <link> Configuration File Element
- <wordImport> Configuration File Element