Introduction
The Tiny EditLive! ASP.NET Server Control has been designed to allow easy integration of the WYSIWYG HTML editing capabilities of EditLive! into ASP.NET Web Forms. The EditLive! ASP.NET Server Control has been designed to allow for seamless interaction between the ASP.NET architecture and the EditLive! applet. Once the required files have been included in an ASP.NET Web project EditLive! can be easily included in any of your ASP.NET Web Forms.
Requirements
- IIS 6.0 or 7.0 (for deployment)
- .NET framework 3.0, 3.5 or 4.0
- Visual Studio 2005 or later (for development)
- EditLive! 8.1 or above.
Installing the EditLive! ASP.NET Server Control
When using the EditLive! ASP.NET Server Control, there are several steps that must be followed. The server control file, EditLiveJavaControl.dll, must be installed in the relevant project. In addition to this, the EditLive! source files and libraries must be deployed on the same Web server as the relevant project. Finally, to provide IntelliSense (popup context menu) support for the EditLive! Server Control in the HTML view of the Web Forms editor, an XML schema file must be placed in a specific directory.
Installing the EditLive! Server Control with the Toolbox
The EditLive! Server Control may be added to the Microsoft Visual Studio .NET Toolbox to allow developers to create an instance of the EditLive! Server Control on a page via the drag-and-drop mechanism. To use the EditLive! Server Control in this manner the following steps must be followed:
- In the Microsoft Visual Studio IDE, select the Tools > Customize Toolbox... menu item.
- Select the .NET Framework Components tab of the Customize Toolbox dialog.
- Click Browse...
- Browse to the location of the EditLiveJavaControl.dll file. This file can be found in the EditLiveControl_INSTALL/webfolder/aspnet/servercontrol/ directory, where EditLiveControl_INSTALL represents the location you installed the control to.
- With the EditLiveJavaControl.dll file selected, click Open.
- Ensure that the EditLiveJava control is now available in the list of .NET Framework Components and that the box next to the name of the control is checked.
- Click OK.
- The EditLive! Server Control should now be available as part of the Microsoft Visual Studio .NET Toolbox.
When using the EditLive! Server Control via the Microsoft Visual Studio .NET Toolbox, the relevant reference will automatically be added to the project when the first instance of the EditLive! Server Control is created.
Installing the EditLive! Server Control as a Project Reference
If the EditLive! Server Control cannot be made available through the use of the Microsoft Visual Studio .NET Toolbox, or you do not wish to make it available, then a reference to it can be added directly to the project. To use the EditLive! Server Control in this manner the following steps must be followed:
- In the Microsoft Visual Studio .NET IDE, select the Project > Add Reference... menu item.
- Select the .NET tab of the Add Reference dialog.
- Click Browse...
- Browse to the location of the EditLiveJavaControl.dll file. This file can be found in the EditLiveControl_INSTALL/webfolder/aspnet/servercontrol/ directory, where EditLiveControl_INSTALL represents the location you installed the SDK to.
- With the EditLiveJavaControl.dll file selected, click Open.
- Ensure that the EditLiveJavaControl.dll file appears in the Selected Components list.
- Click OK.
The EditLive! Server Control is now available to reference from the project. Instances of the control can now be created using the tag associated with it.
Other Files Required to Use EditLive! in an ASP.NET Web Application
In addition to including the EditLiveJavaControl.dll file in your ASP.NET project, either through the ASP.NET Toolbox or a project reference, the EditLive! source files and libraries must be present on the same Web server as the relevant project. It is recommended that, in order to ensure that these files are present on the same Web server as the relevant project, they be added to the project itself. These files can be found within the redistributables/editlivejava directory and its subdirectories.
- The redistributables/editlivejava directory contains the source files and libraries for use with EditLive!. The files in this directory must be present on the Web server in order to instantiate EditLive!. This directory must be available on the same Web server as the relevant project as relative links to it must be able to be created.
As the Microsoft Visual Studio .NET IDE does not allow directories and their contents to be recursively added to a project, the following method describes a way to easily add the EditLive! source files and libraries to your .NET Web Project:
- Copy the redistributables directory and all its subdirectories, which contain the EditLive! for Java source files and libraries, to the relevant Web project directory so that the redistributables directory is a sub-directory within the Web project.
- Open the Solution Explorer window by selecting the View > Solution Explorer menu item.
Once the Solution Explorer window is open select the Project > Show All Filesmenu item to reveal all the files within the Web project's directories.
If the Show All Files option is already selected before performing this step it may have to be unselected and then reselected.

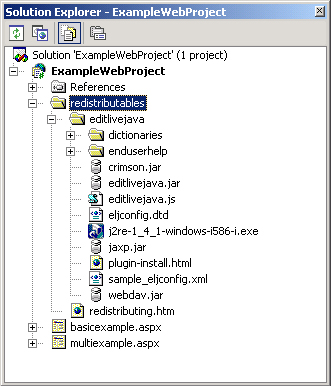
- In the Solution Explorer, select the root directory for the EditLive! source files and libraries which have not yet been included in the project (files which are not included are represented as uncolored icons, as above). In the example above the relevant directory is the redistributables directory.
- With the relevant root directory selected (in the above example, the redistributables directory), select the Project > Include In Project menu item.
- The Solution Explorer window should now have colored representations of the EditLive! source files and libraries. It should look similar to the following figure.

Constraints
By default ASP.NET forms cannot post values containing HTML. In order to successfully post EditLive!'s content, you will need to ensure the page directive contains the validateRequest="false" parameter.
In ASP.NET 4.0, you also need to add the following to your web.config, in the <system.web> section:
<httpRuntime requestValidationMode="2.0" />