Overview
EditLive! provides an extensive variety of styles you can apply to your content. As a user you can apply different fonts, colors and sizes to your content. EditLive! also allows you to choose the alignment on the page for specific content, as well as applying font formatting such as underlines.
This topic explains how to achieve the following:
Applying Bold, Italic or Underline Formatting to Text
There are 3 basic methods for applying bold, italic or underline formatting to text:
- Keyboard Shortcuts
- Toolbar Buttons
- Menu Items
Keyboard Shortcuts
- Bold - Press Ctrl and B
- Italics - Press Ctrl and I
- Underline - Press Ctrl and U
Toolbar Buttons
The EditLive! toolbar provides the following buttons for applying bold, italic and underline formatting to text:
 Bold
Bold Italic
 Underline
Menu Items
The bold, italic and underline formatting commands are located under the Format menu:
- Bold
- Italic
- Underline
Applying Bold, Italic or Underline Formatting
Bold, Italic or Underline formatting can be applied in one of two ways
- Select the desired text (by holding down the left mouse button and moving the mouse over the desired text). With the text selected, specify bold, italic or underline (or any combination of the three) by using any of the above mentioned methods.
- Move the cursor to the position in your content where you want to create formatted content. Select bold, italic or underline (or any combination of the three) using any of the above mentioned methods. Begin typing your text to use the selected format.
Applying Alignment Formatting to Content
EditLive! provides 3 different forms of content alignment:
- Align Left - Content will be aligned to the left side of the page
- Align Center - Content items will be rendered in the middle of the page
- Align Right - Content will be aligned to the right side of the page
There are 3 basic methods for applying alignment to content:
- Keyboard Shortcuts
- Toolbar Buttons
- Menu Items
Keyboard Shortcuts
- Align Left - Press Ctrl and L
- Align Center - Press Ctrl and E
- Align Right - Press Ctrl and R
Toolbar Buttons
The EditLive! toolbar provides the following buttons for applying alignment to content:
 Align Left
 Alight Center
 Align Right
Menu Items
The alignment commands are located under the Format menu:
- Align Left
- Alight Center
- Align Right
Applying Alignment to Content
Alignment of content can be applied in one of two ways
- Select the desired text (by holding down the left mouse button and moving the mouse over the desired text). With the text selected, specify the desired alignment type by using any of the above mentioned methods.
- Move the cursor to the position in your content where you want to create formatted content. Select the desired alignment type by using any of the above mentioned methods. Begin typing your text to use the selected alignment.
Applying Different Colors to Text
EditLive! allows you to change both the foreground and the highlight (or background) color of text.
There are 2 basic methods for changing the foreground or highlight color of text:
- Toolbar Buttons
- Menu Items
Toolbar Buttons
The EditLive! toolbar provides the following buttons for changing the color of text:
 Highlight Color
 Text Color
For either of these buttons, EditLive! provides 4 different methods for selecting the desired color:
Default Colors
Clicking either of the toolbar buttons specified above will display a list of default colors. Clicking the desired color to apply this color to selected text or to begin writing text in this color.
Swatches
Click either of the toolbar buttons specified above. Click the More Colors... text. Click the Swatches tab at the top of the dialog. This dialog screen allows you to select a color from a list of hundreds of colors.
Menu Items
The menu items for adding color to text are located under the Format menu:
- Highlight Color
- Text Color
Selecting either of these menu items will then display a list of default colors. Select any color from this list to then apply this color to selected text or to begin writing text in this color.
Applying Font-Face or Font Size Changes to Text
EditLive! allows you to change the font-face or the font size of text
There are 2 basic methods for changing the font face or size for text:
- Toolbar Combo Boxes
- Menu Items
Toolbar Combo Boxes
The EditLive! toolbar provides the following combo box for applying a new font face:

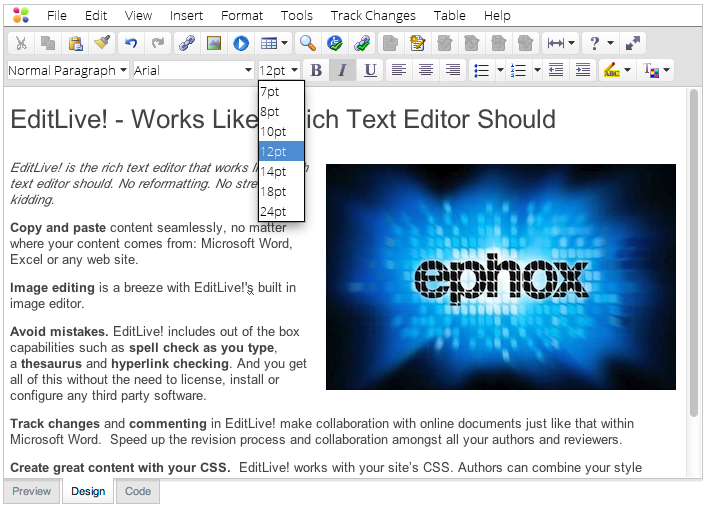
The EditLive! toolbar provides the following combo box for applying a new font size:
Menu Items
The menu items to apply a font-face or font-size can be located under the Format menu:
- Font
- Size
Selecting these menu items will display a list of the available font faces or sizes, respectively.
Applying Font Face or Size Changes to Content
Font faces or styles can be applied in one of two ways
- Select the desired text (by holding down the left mouse button and moving the mouse over the desired text). With the text selected, specify the desired font face or size by using any of the above mentioned methods.
- Move the cursor to the position in your content where you want to create formatted content. Select the desired font face and/or size by using any of the above mentioned methods. Begin typing your text to use the selected alignment.
Applying Predefined Styles
Your Systems Administrator will have defined a list of predefined styles available for generating text with. These predefined styles will use a combination of all the above mentioned styles. For example, one style may render text in bold, with right alignment, in the color red.
There are 2 basic methods for applying a new predefined style:
- Toolbar Combo Boxes
- Menu Items
Toolbar Combo Boxes
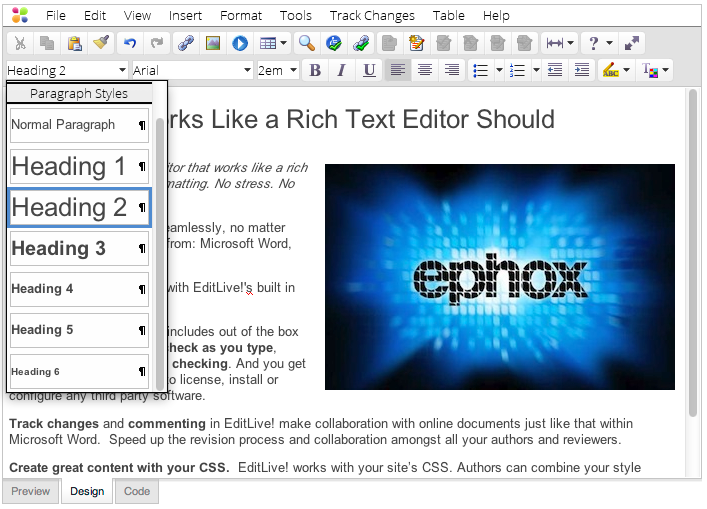
The EditLive! toolbar provides the following combo box for applying a new predefined style:
Menu Items
The menu item to apply a predefined style can be located under the Format menu:
- Style
Selecting this menu items will display a list of the available predefined styles.
Applying Predefined Styles to Content
Predefined styles can be applied in one of two ways
- Select the desired text (by holding down the left mouse button and moving the mouse over the desired text). With the text selected, specify the desired predefined style by using any of the above mentioned methods.
- Move the cursor to the position in your content where you want to create formatted content. Select the desired predefined style by using any of the above mentioned methods. Begin typing your text to use the selected style.