Please contact IBM if you require support.
Overview
Tone Analyzer is a new Textbox service that is available to IBM WCM users as of the CF15 release. Tone Analyzer processes text and provides feedback around the emotions that are likely to be experienced by people who read your content.
Please note that Tone Analyzer is disabled by default; enablement instructions can be found further below.
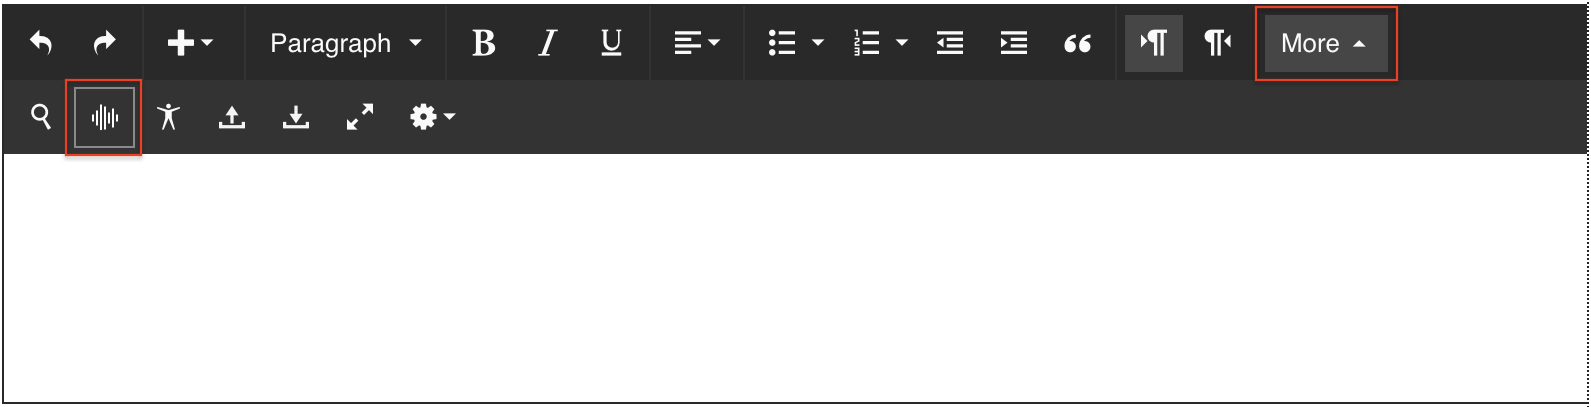
Once enabled, the Tone Analyzer service can be called by clicking on the Tone Analyzer button in the toolbar, under the "More" menu.
(click image to enlarge)

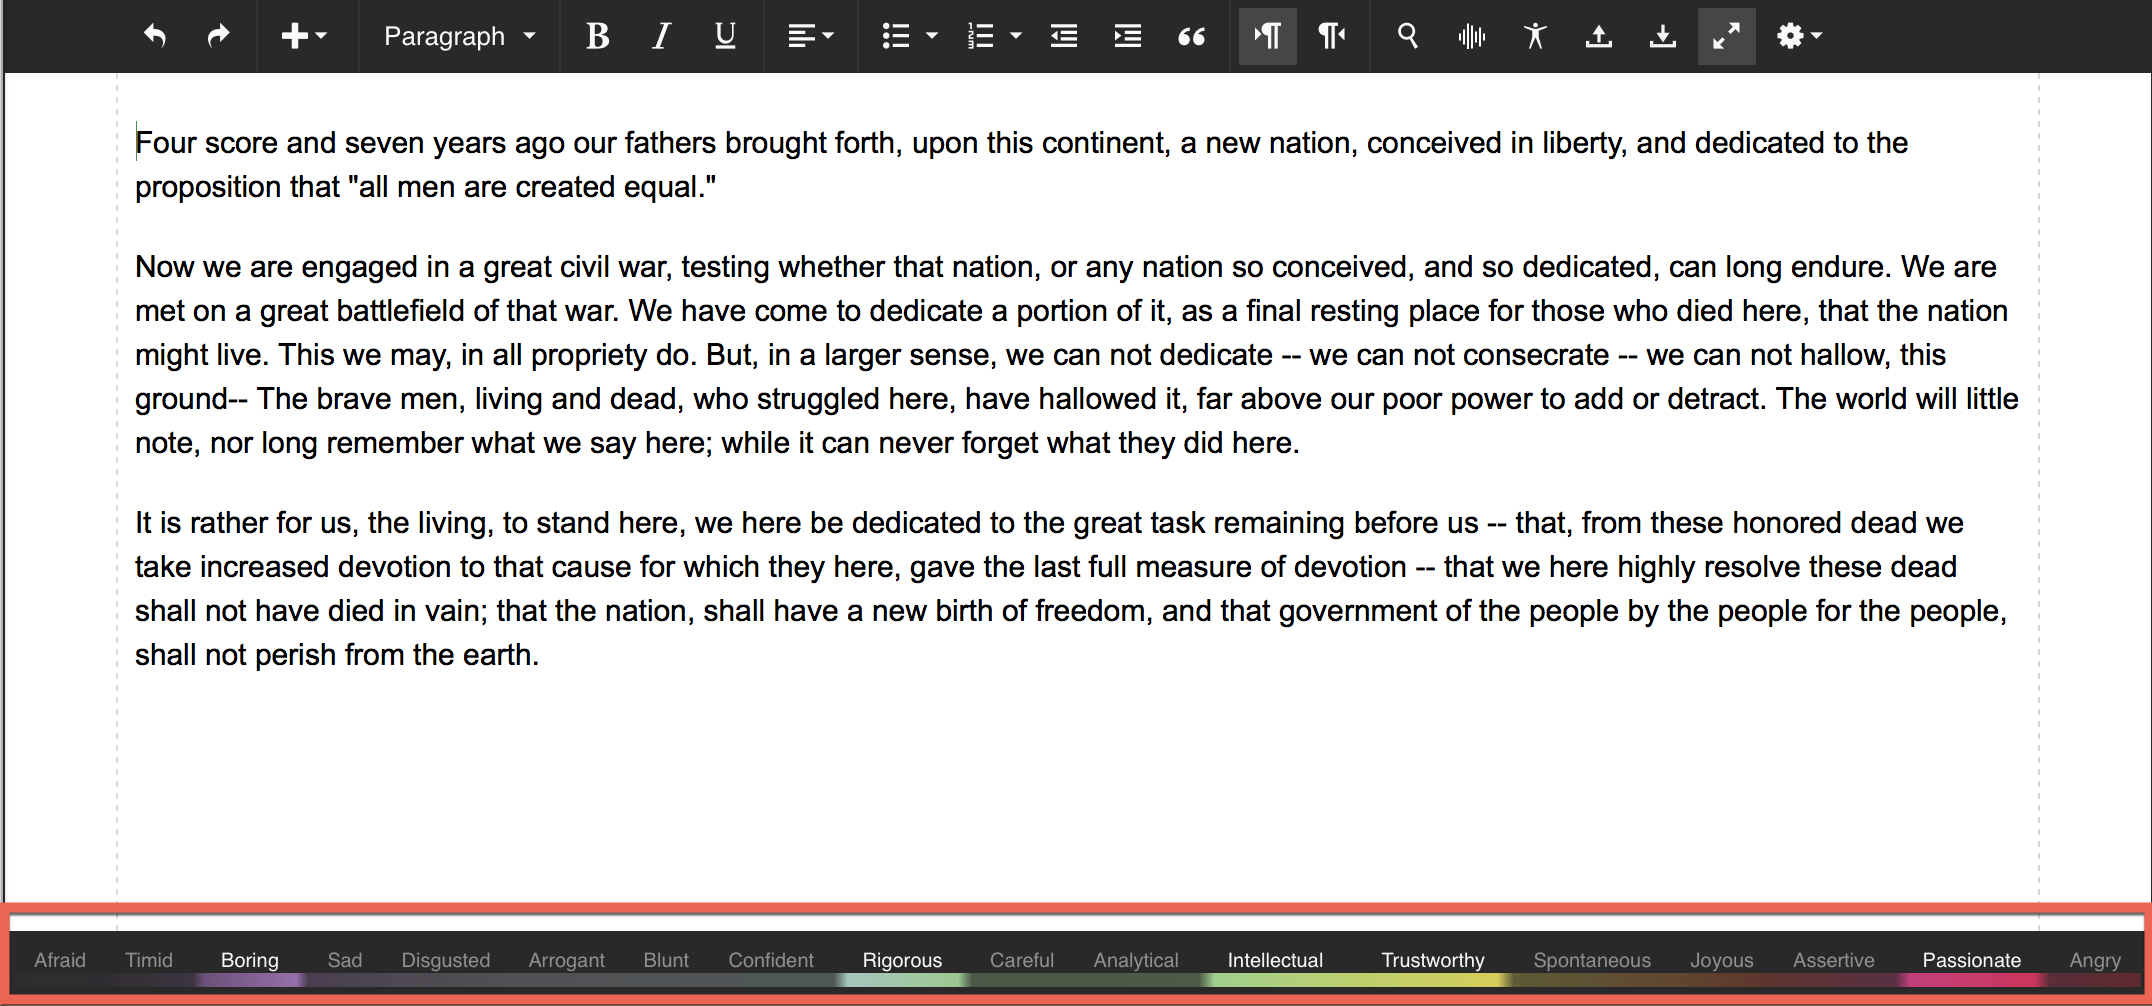
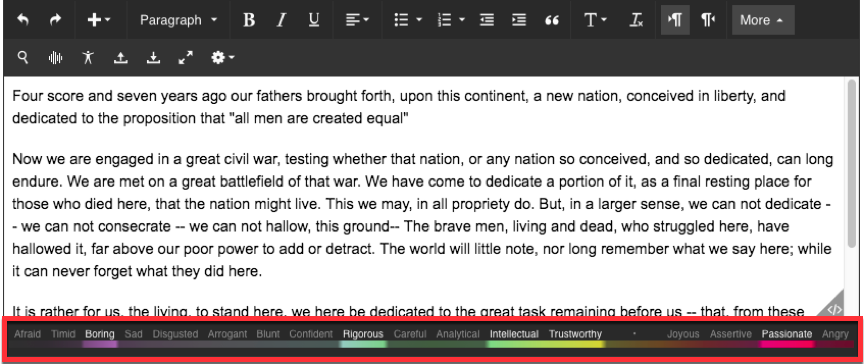
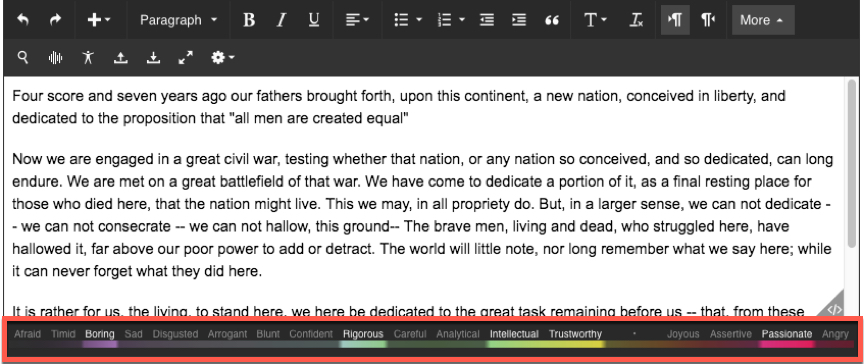
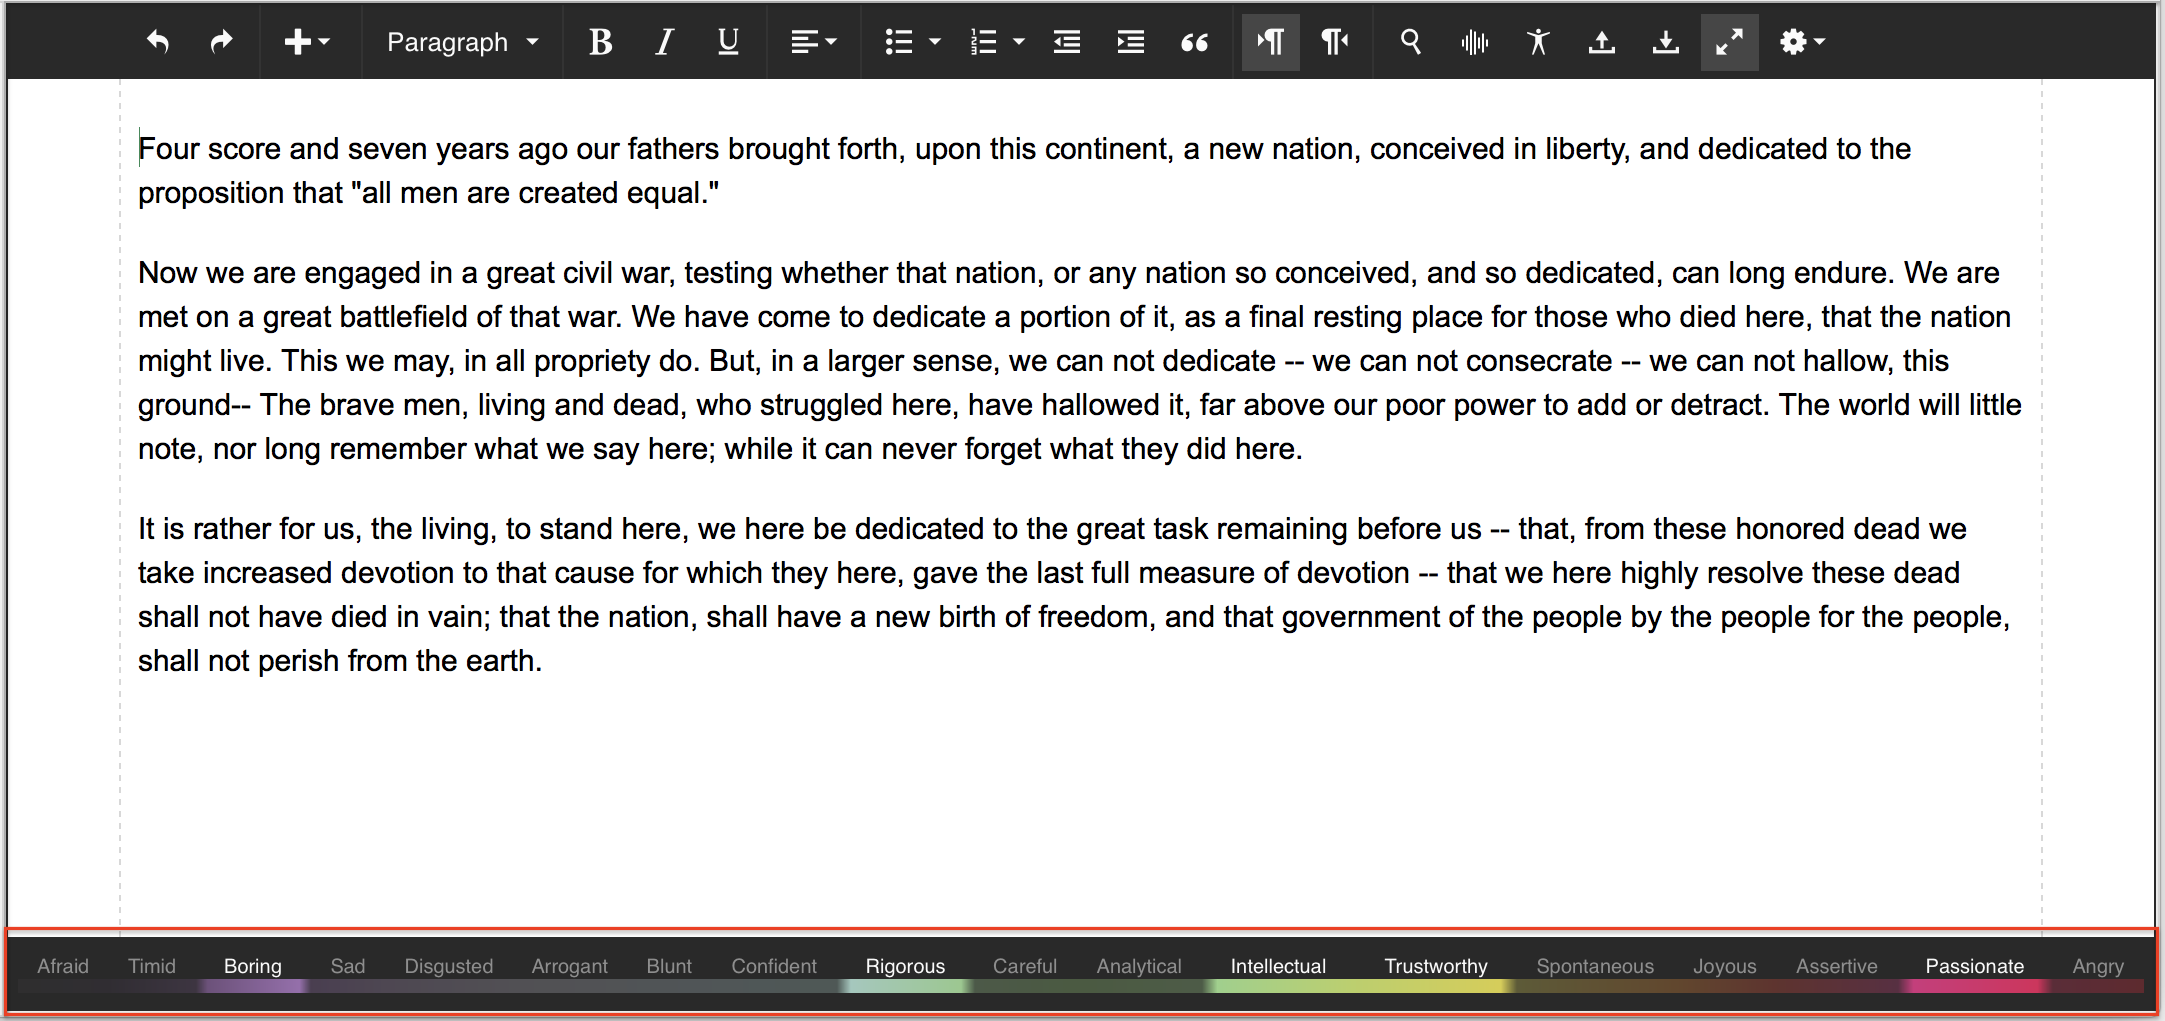
The emotional tones that are present in your content will be highlighted on the tone bar, which will appear at the bottom of your editor.
(click image to enlarge)
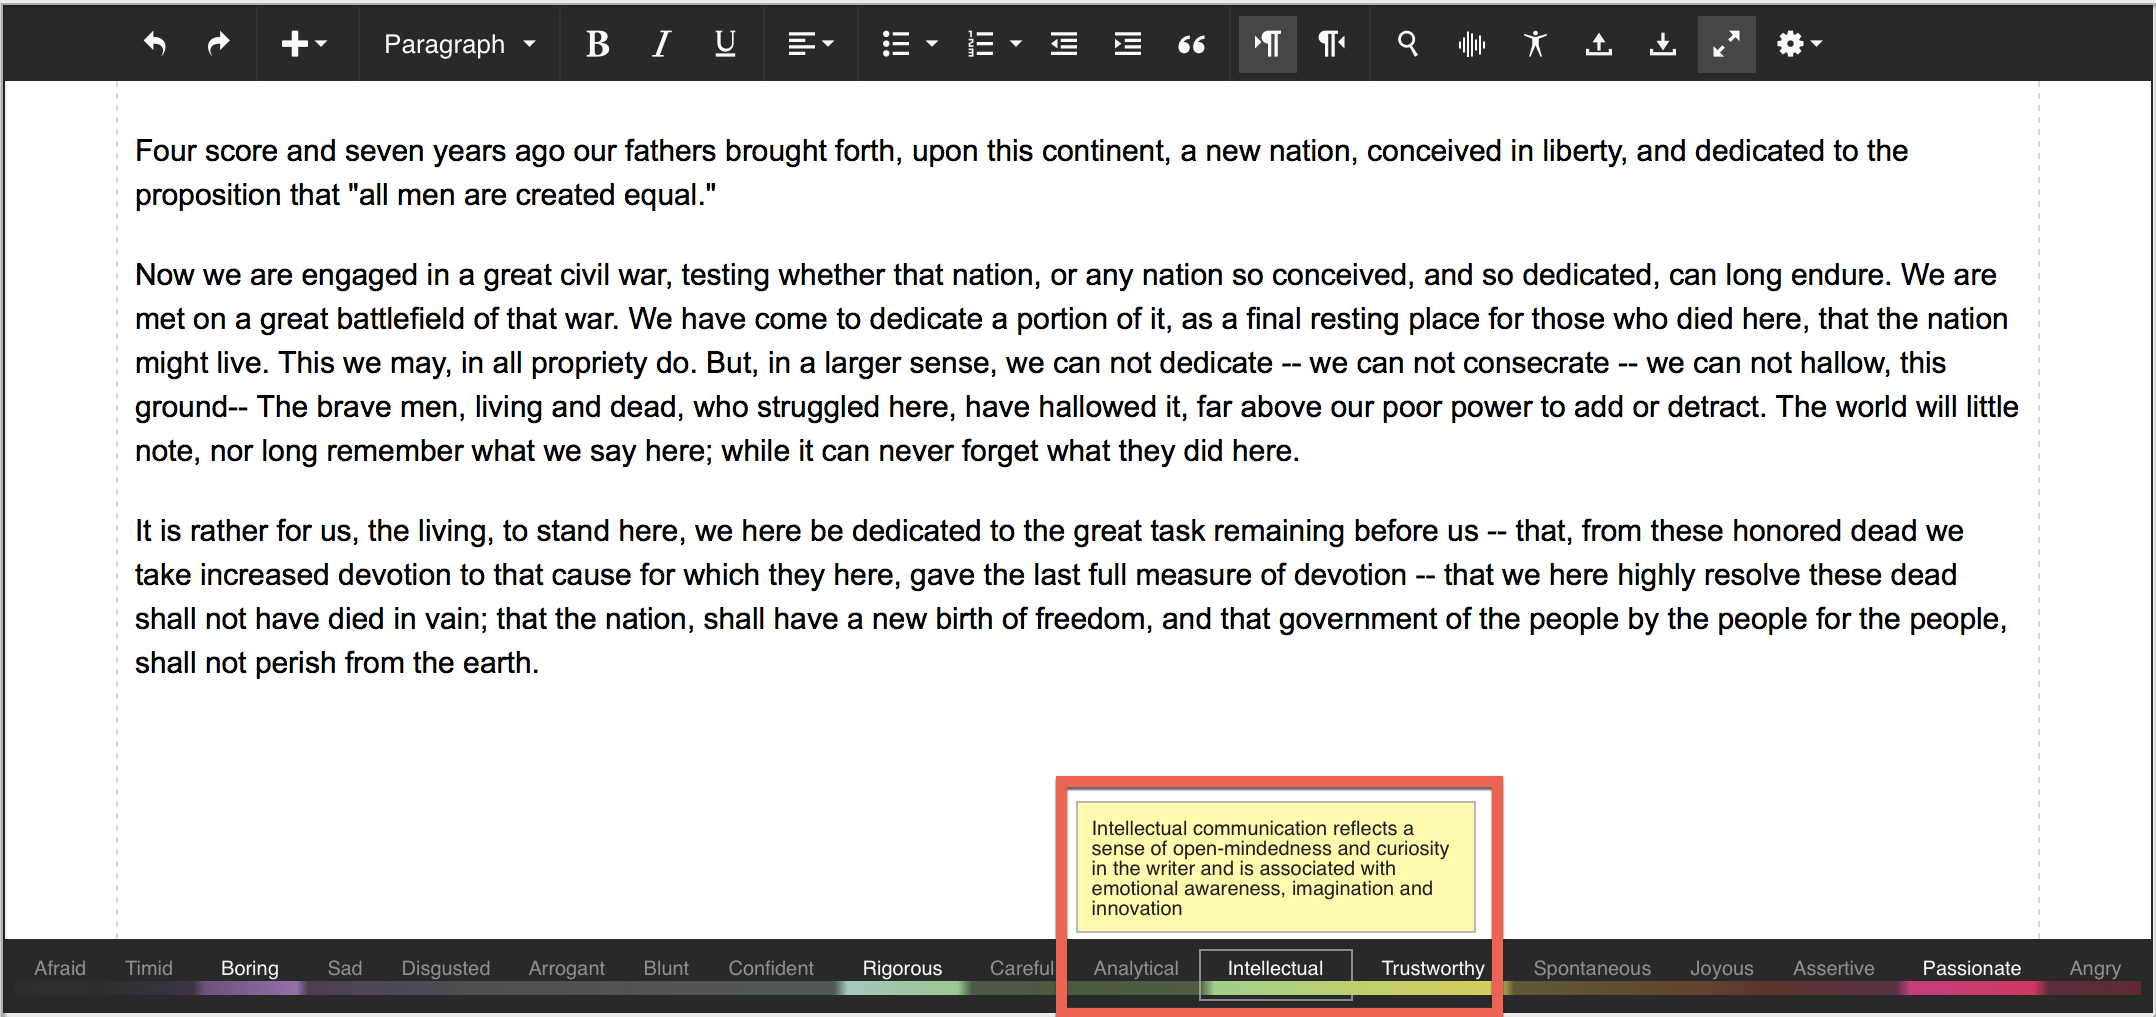
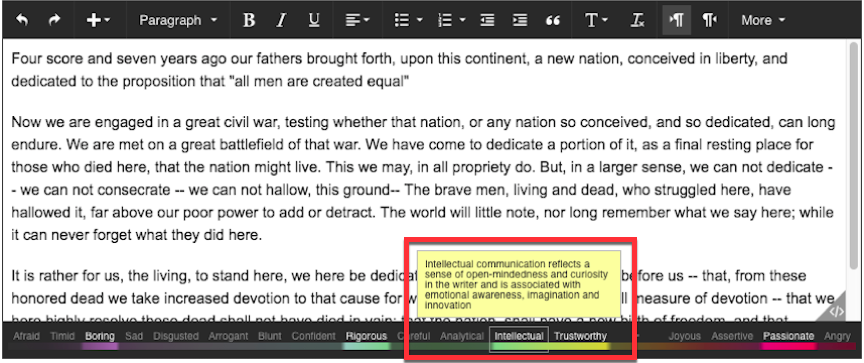
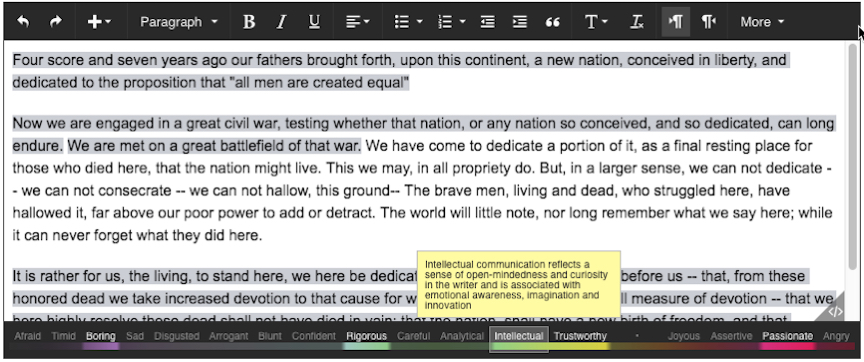
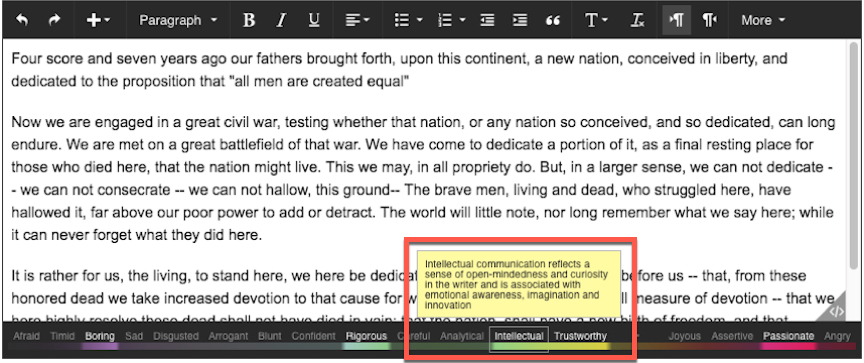
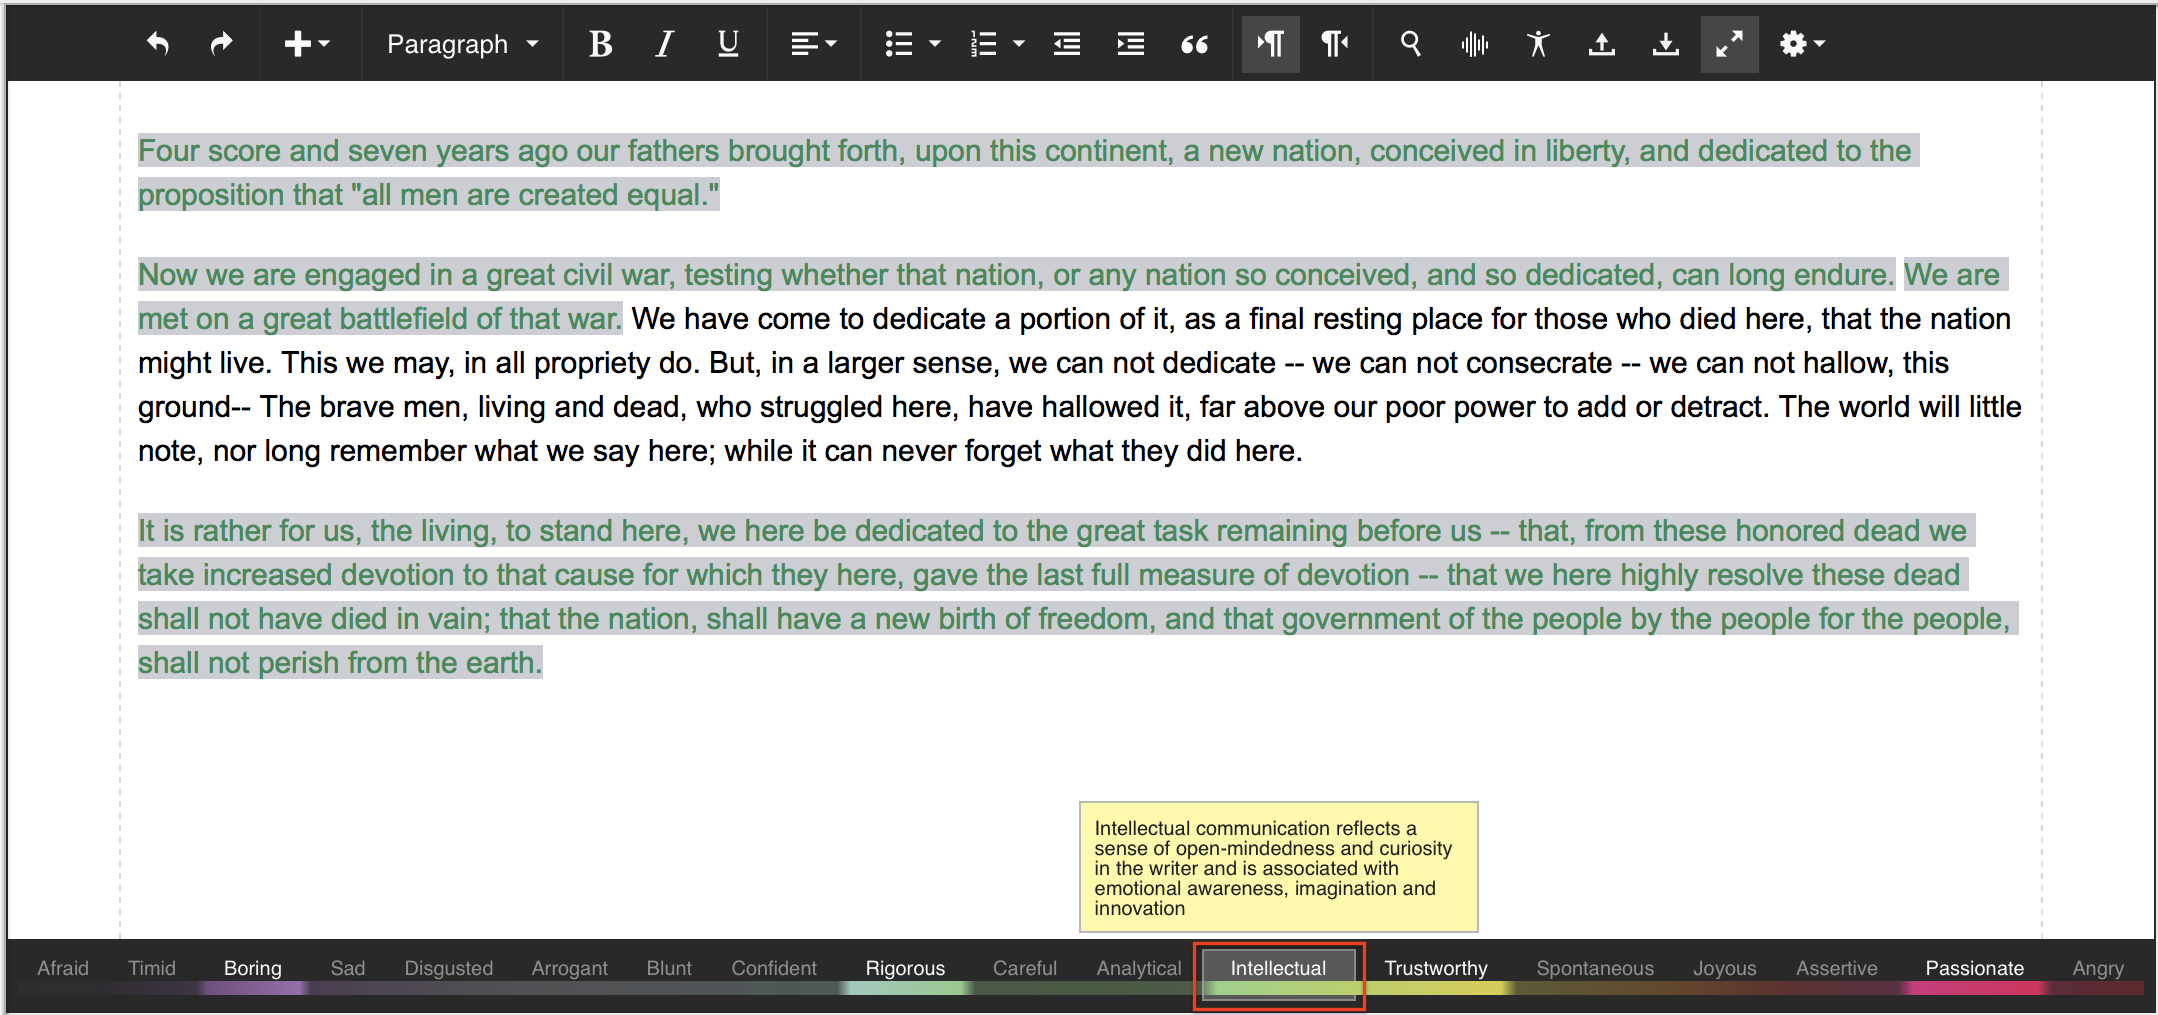
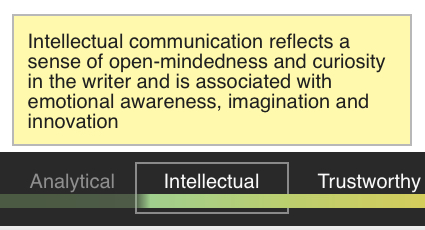
Hovering over a highlighted tone provides more information about that specific tone.
(click image to enlarge)
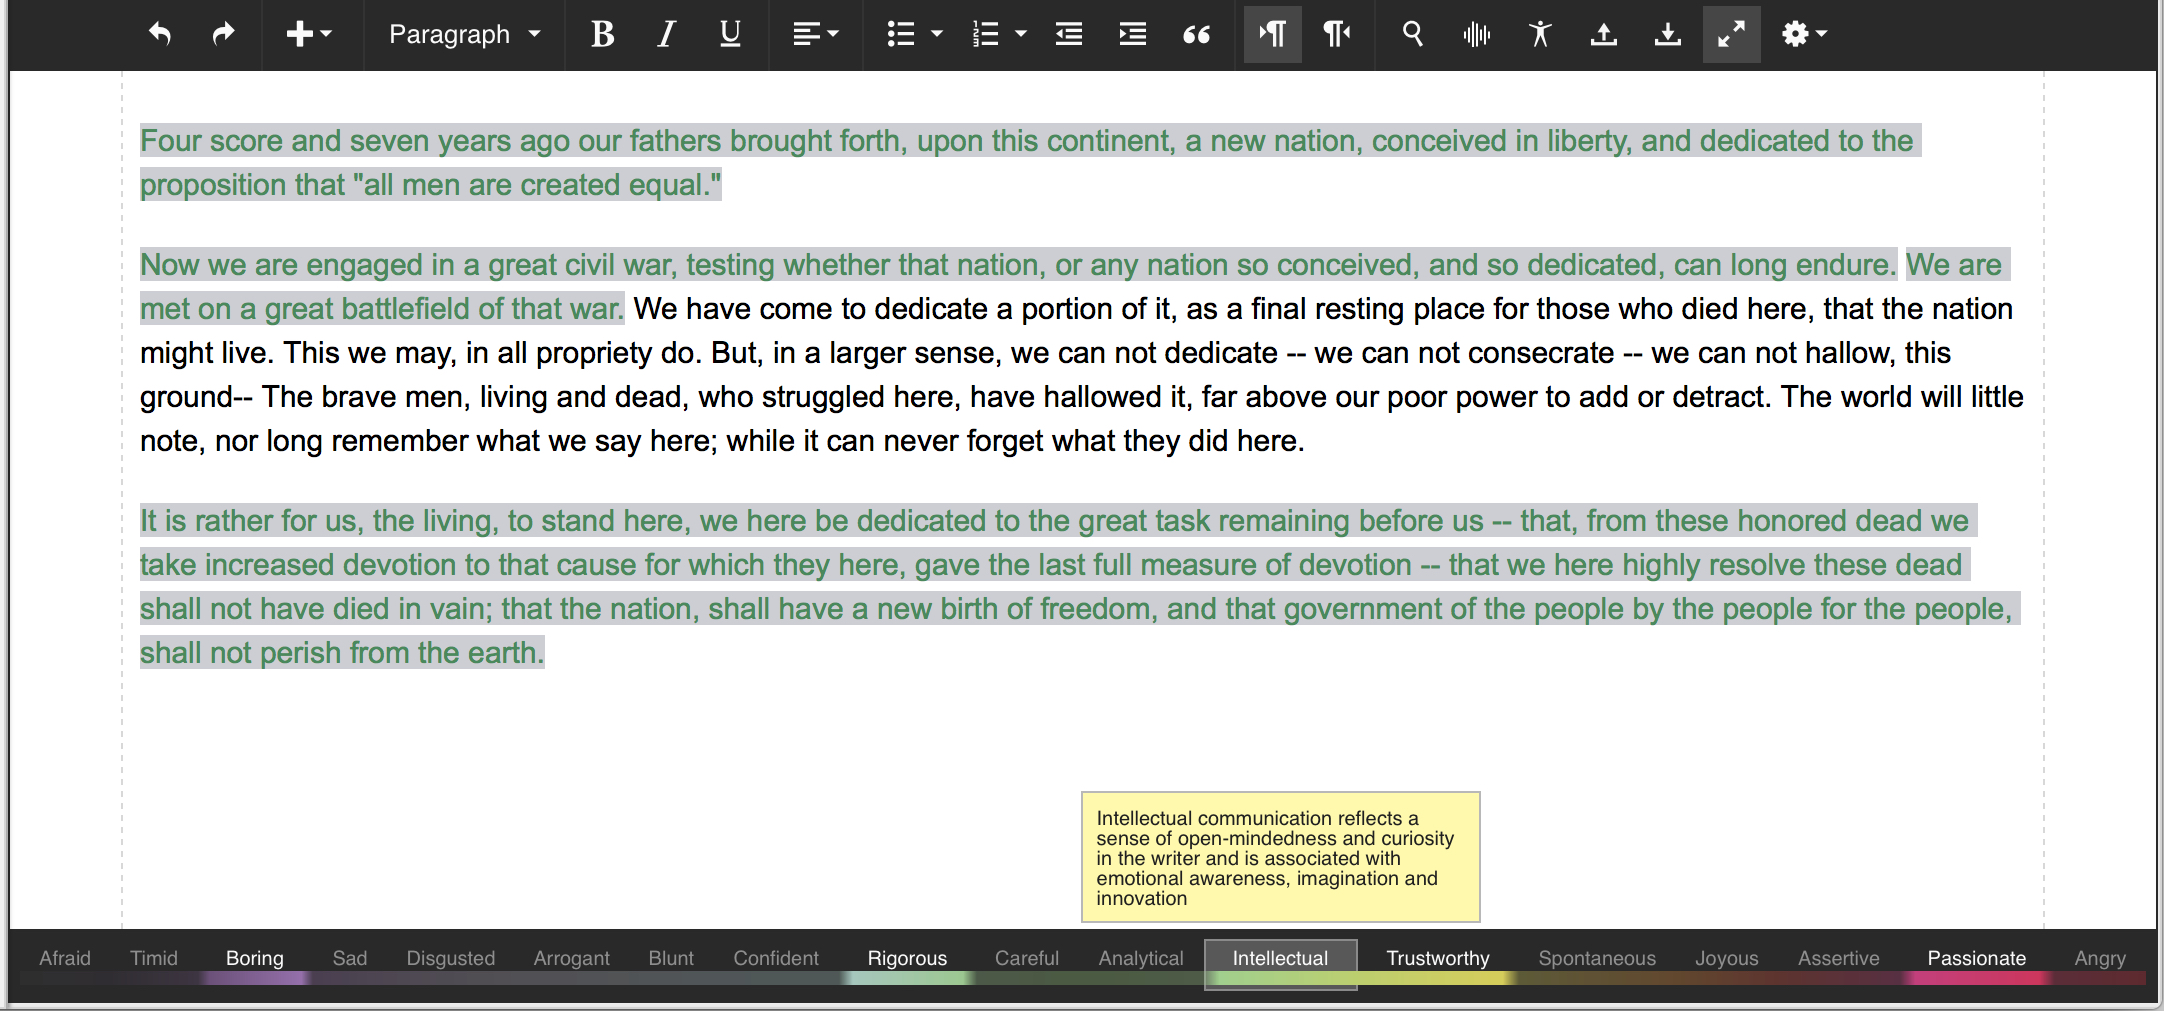
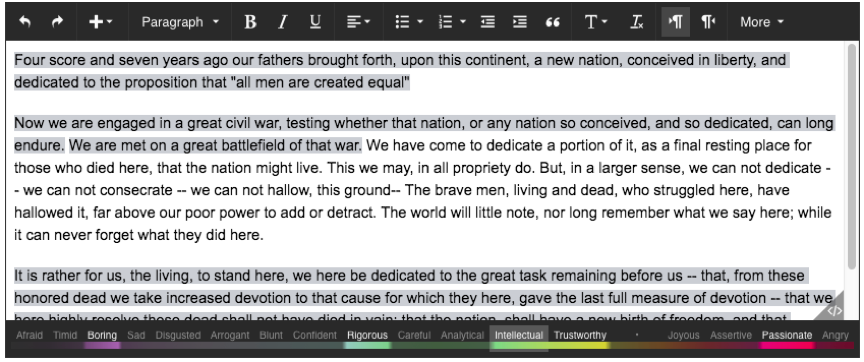
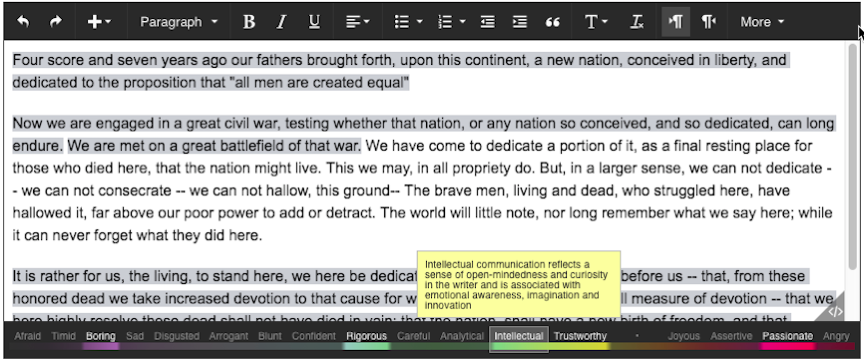
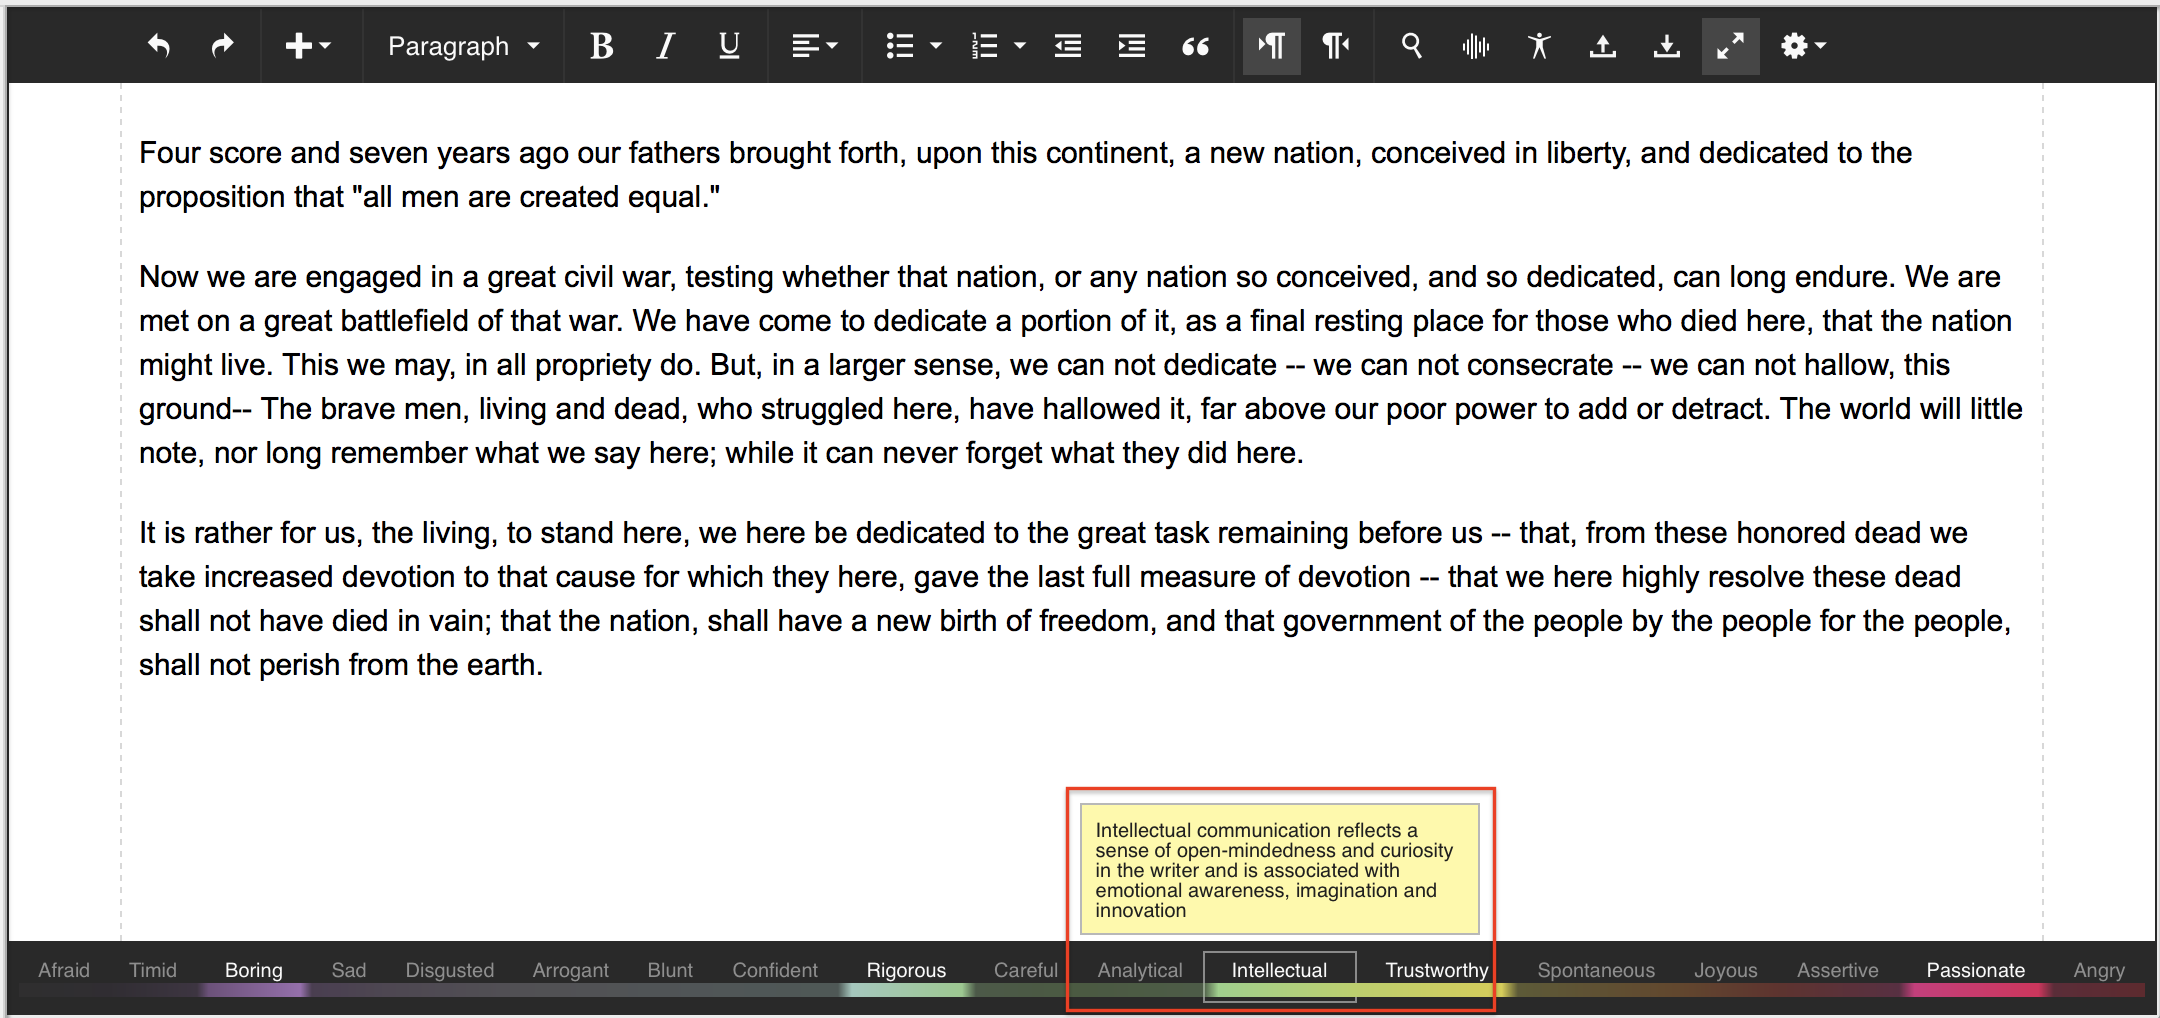
Clicking on a highlighted tone will highlight all the text in your content that helps to produce that particular tone.
(click image to enlarge)
Clicking on the tone again removes the highlighting.
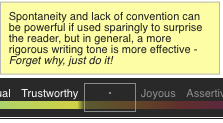
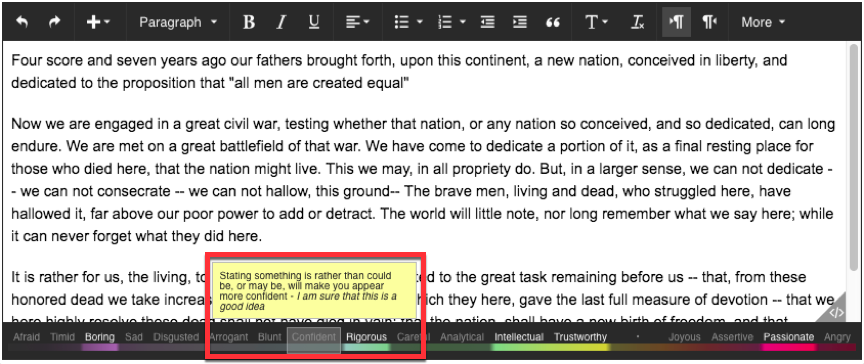
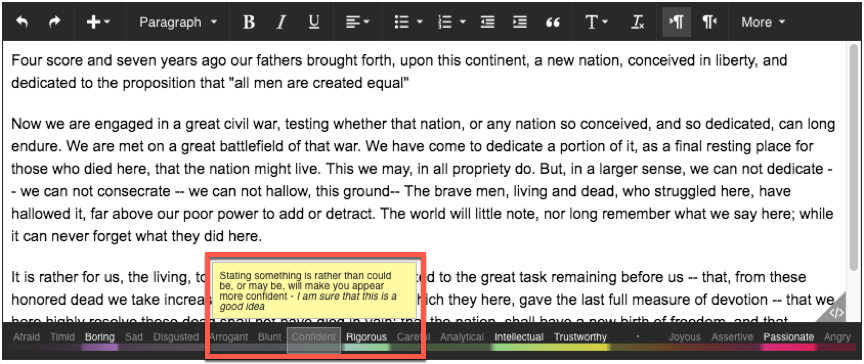
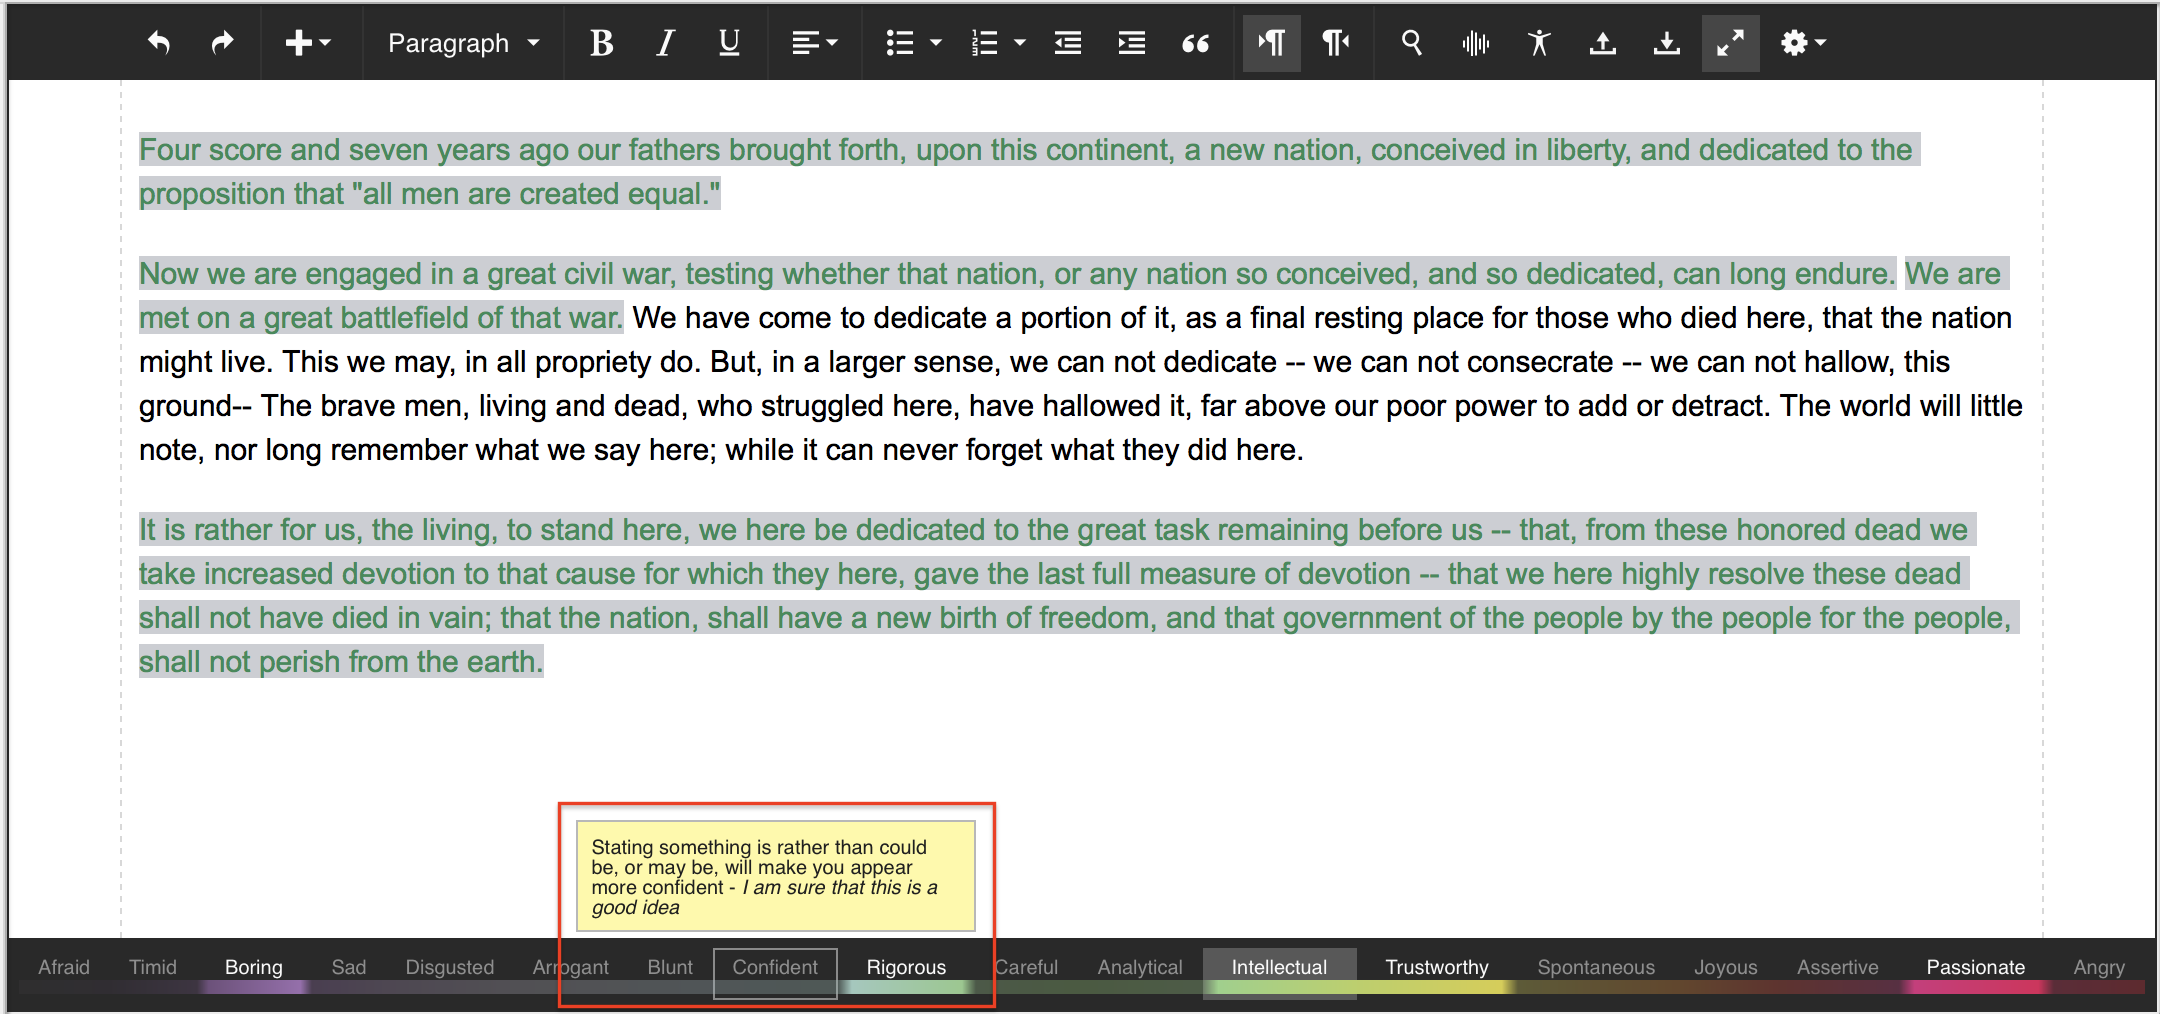
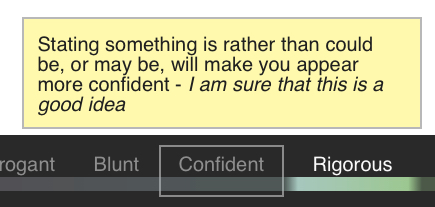
You can also click on a non-highlighted tone and receive guidance on how your content could produce that tone.
(click image to enlarge)

Once Tone Analyzer has been activated, the service will periodically rescan your text and update the tone bar as needed.
While the Tone Analyzer will work with any amount of text, ten sentences is the minimim recommended amount, and the more text you provide the better.
A note on editor width and the tone bar:
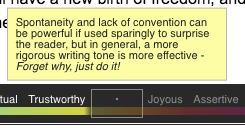
Depending on the width of your editor, the Tone Bar may not have enough room to display all of the tones.
If this is the case, the Tone Bar will start with non-highlighted tones and replace them with a dot, until the tone bar can fit into the width of the editor. Here's an example of what that might look like:
(click image to enlarge)

However, even if the tone itself is replaced by a dot, you can still hover over that dot to see the tone, and its associated information.
(click image to enlarge)
Enablement Instructions
Please note:
- The below steps are specific to users only needing to set up the Tone Analyzer service
- For all other information around installing, updating, customizing and/or configuring Textbox services within the WCM integration, start here.
- The Tone Analyzer service can be used within:
- The authoring portlet which provides a form type UI.
- The draft page, when choosing the option to display the entire authoring form.
- The Tone Analyzer service can NOT be used:
- When the editor appears "in place" within the content area on a draft page
Obtain credentials for the Tone Analyzer service
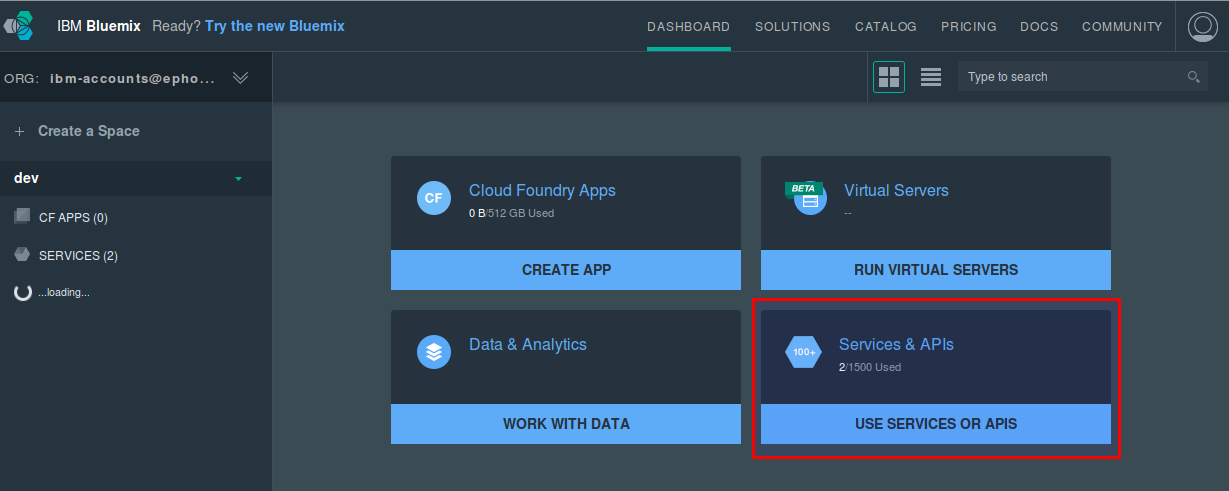
In order to create credentials for the Tone Analyzer service, you must have an IBM Bluemix account.
- Once logged in into your Bluemix account, click on the "USE SERVICES OR APIS" box within the Bluemix dashboard.
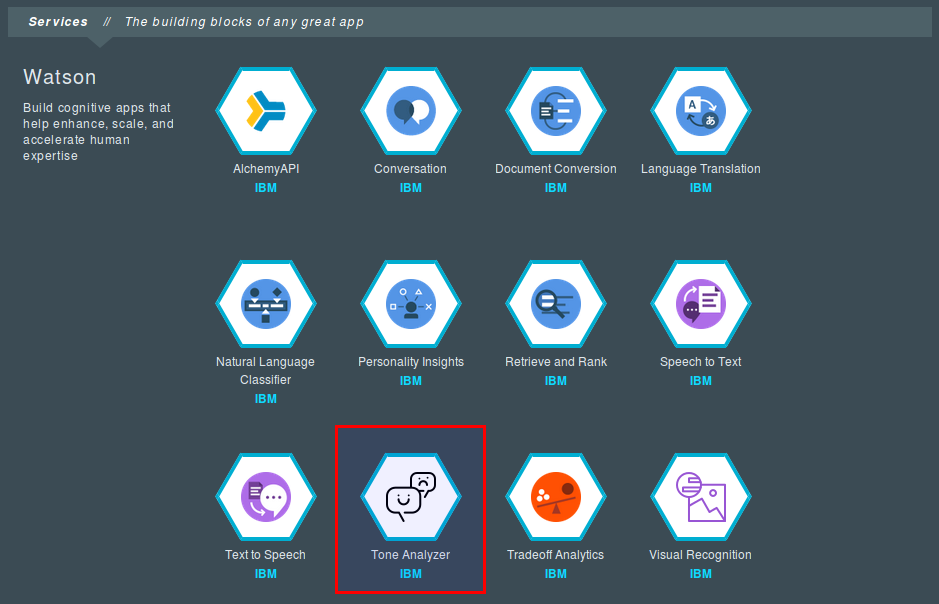
- Inside the "Services" menu, select "Tone Analyzer" to generate the credentials.
Configure the Tone Analyzer service
The service needs additional information to run correctly, where applicable, including:
- Which service should run
- The URLs that they will be accessed from
- Proxy settings to get around firewalls
- API keys for external services
- Configuration of service behavior
Note: Allowed Origins Service
In previous versions of the Textbox.io services, you could use the ephox.allowed.origins.url setting to point to the Allowed Origins Service. This service has been discontinued.
Allowed Origins are now configured in the configuration file as below.
You can specify configuration for the Textbox.io server-side features using one of two options.
File based configuration
You can create an application.conf file and specify the settings as documented in the Configuring Textbox.io Services article with the following variations for Connections and WebSphere:
1. Create application.conf
On the drive/partition where WebSphere Application Server (WAS) is installed, create the text file
| Operating System | Path | Notes |
|---|---|---|
| Linux/Unix | /opt/ephox/application.conf | |
| Windows | DRIVE:\opt\ephox\application.conf | DRIVE is the drive where Websphere Application Server is installed, e.g. "C", "D" or "E" etc |
2. Edit application.conf
Edit this file as shown in section "Create a configuration file" on the installing the server-side components page and Textbox.io documentation.
If you have an API key for IBM Tone Analyzer you can specify the key as follows:
ephox {
  # Tone service configuration
  cognitive {
    tone-analyzer {
      user-name = "<user_name>"
      password = "<password>"
    }
  }
  # Note: other configurations (as in the example above) omitted here for brevity
}
Substitute <user_name> with the actual user name. Substitute <password> with the actual password.
JVM System properties based configuration
If the file-based mechanism is not appropriate, you can set JVM system settings for the configuration of the services.
The following steps describe the process for setting the configuration using JVM system properties.
1. Find JVM settings
Find your JVM settings according to the version of Websphere that you are running. Use this page to do so: http://www-01.ibm.com/support/docview.wss?uid=swg21417365
2. Specify system properties
Specify the domains where the editor is served from, and optionally other settings such as link caching and proxy configuration. For details, please review Server-Side Components - Installation and Setup for Textbox.io.
-Dephox.allowed-origins.origins.0=http://connections
-Dhttp.proxyHost=someproxy.internal.corp
-Dhttp.proxyPort=8080
When specifying the URL/s for the domains that will serve the Textbox.io editor, you may need to specify different combinations of the protocol, hostname and port based on the browsers you use. For more details, please review Server-Side Components - Installation and Setup for Textbox.io.
If you need additional domains where the editor is served from, you need to specify additional allowed origins by repeating -Dephox.allowed-origins.origins.0=domain, replacing the “0” with an incrementing number for each domain that is added.
-Dephox.allowed-origins.origins.1=http://connections.yourdomain
-Dephox.allowed-origins.origins.2=http://connections:10039
-Dephox.allowed-origins.origins.3=http://connections.yourdomain:10039
If you have an API key for IBM Tone Analyzer you can specify the key as follows:
-Dephox.cognitive.tone-analyzer.user-name=<user_name>
-Dephox.cognitive.tone-analyzer.password=<password>
Substitute <user_name> with the actual user name without any quotes. Substitute <password> with the actual password without any quotes.
Install the Textbox.io services for IBM WCM
Follow the instructions on this page to install the Textbox.io services for IBM WCM, which include the spelling, hyperlinking, image-proxy and cognitive services.
Installing the cognitive service gives you access to the Tone Analyzer.
Important
This application must be installed on the same WebSphere Application Server as WCM. Be sure to assign all modules to the correct server in the Manage Modules page.
Installation steps
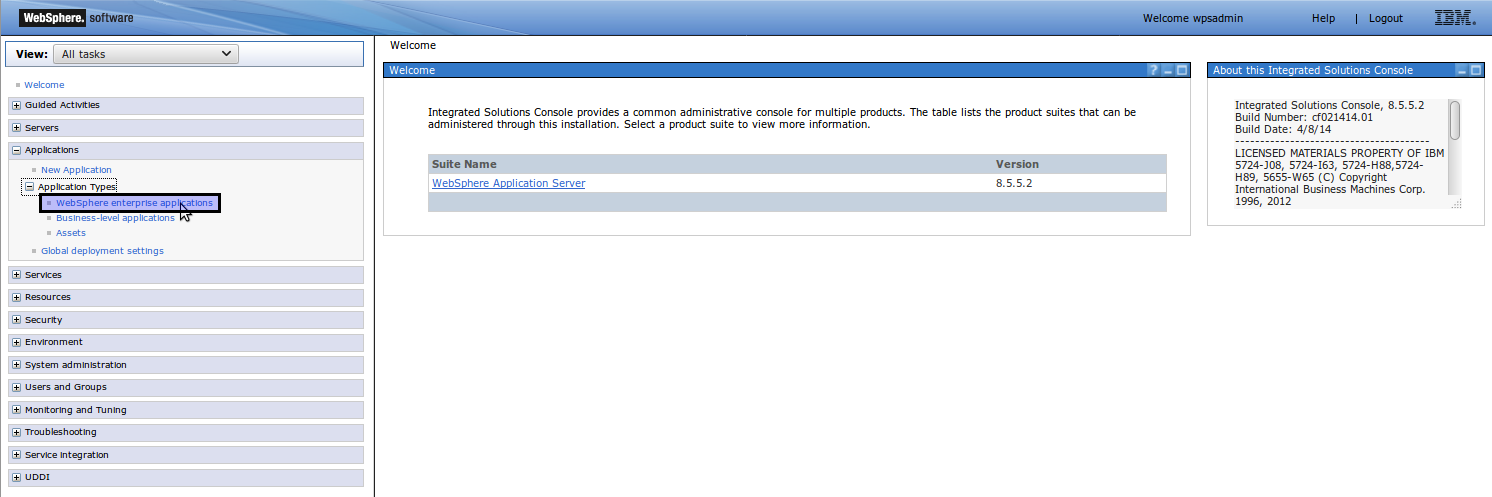
- Log into your WebSphere Application Server Console (e.g. https://server:port/ibm/console/).
- Click "Applications" > "Application Types" > "WebSphere enterprise application".
- Click "Install".
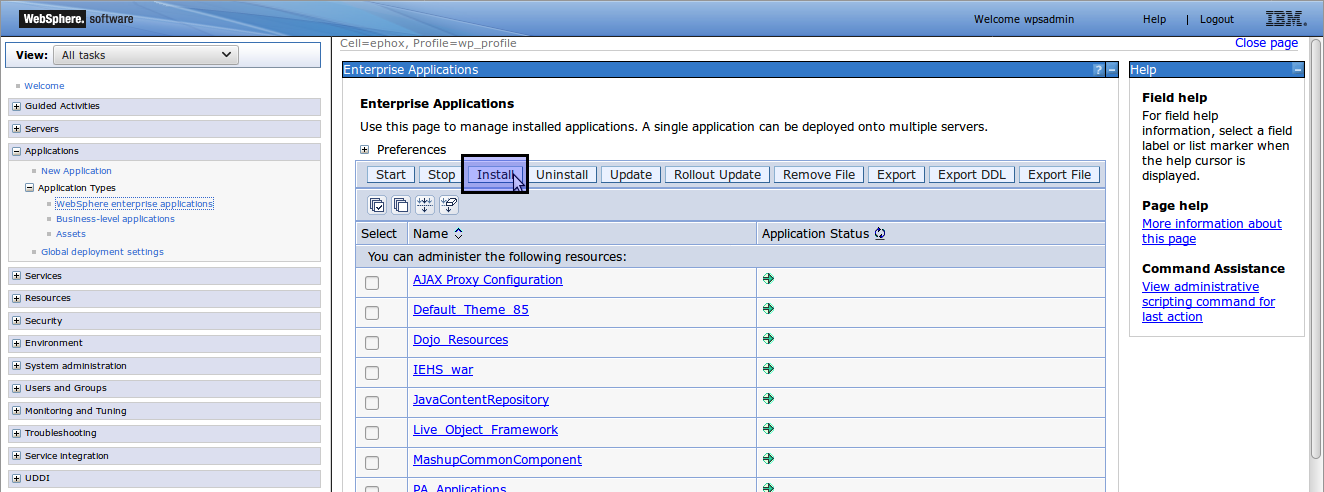
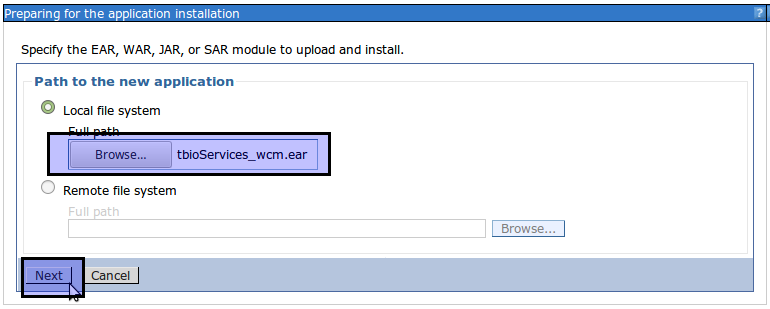
- Provide path to "tbioServices_wcm.ear" and click "Next".
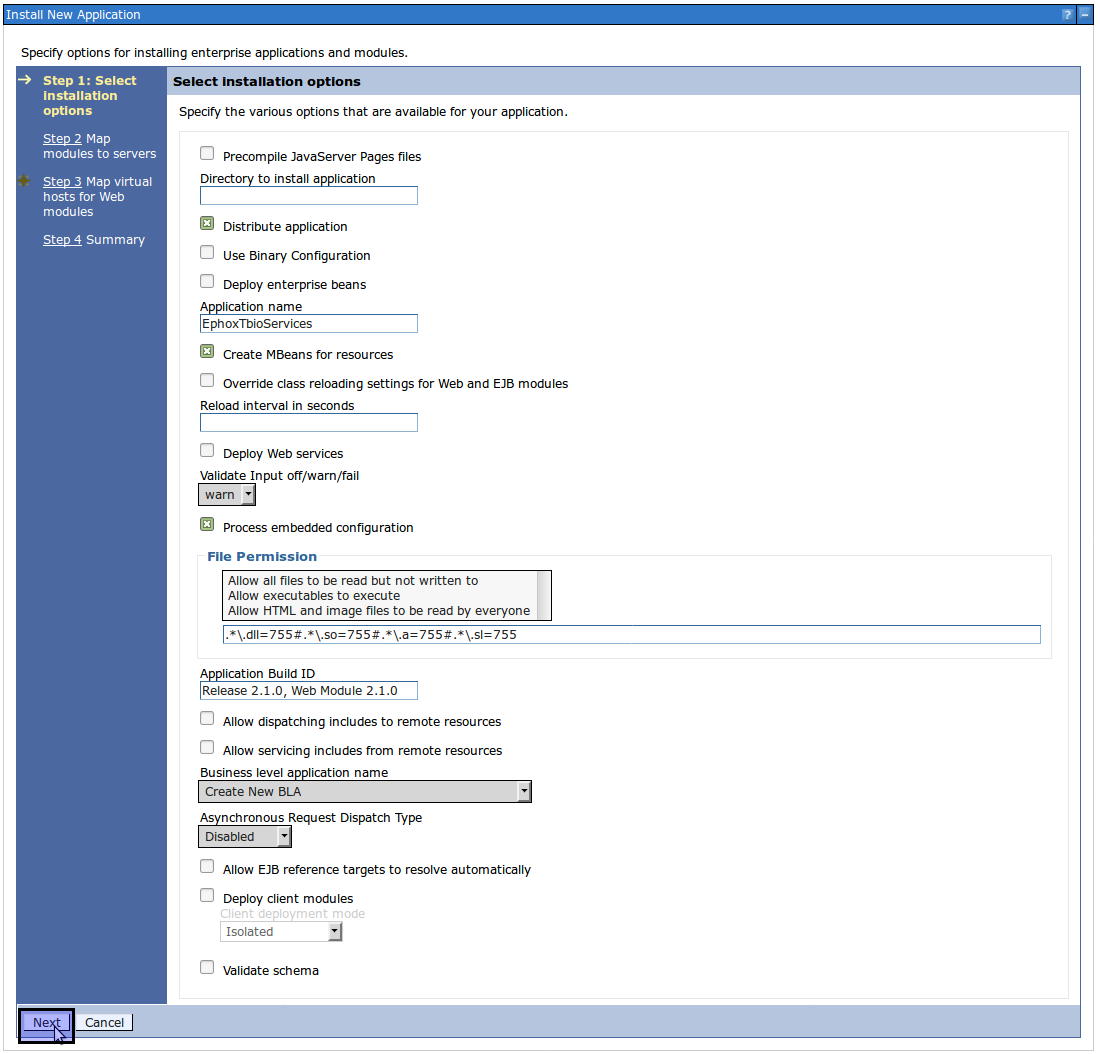
- Select "Fast Path" and click "Next".

- Keep the default installation options and click "Next".
- Make sure that the modules are deployed to the server running WebSphere Portal. Typically this will be the server called "WebSphere_Portal". If this server does not appear in the list, it may not have been started yet.
To ensure that the modules are deployed to the right location, you will need to select the server, select the modules, and then click "Apply".
Once the modules are mapped to the correct server, click "Next".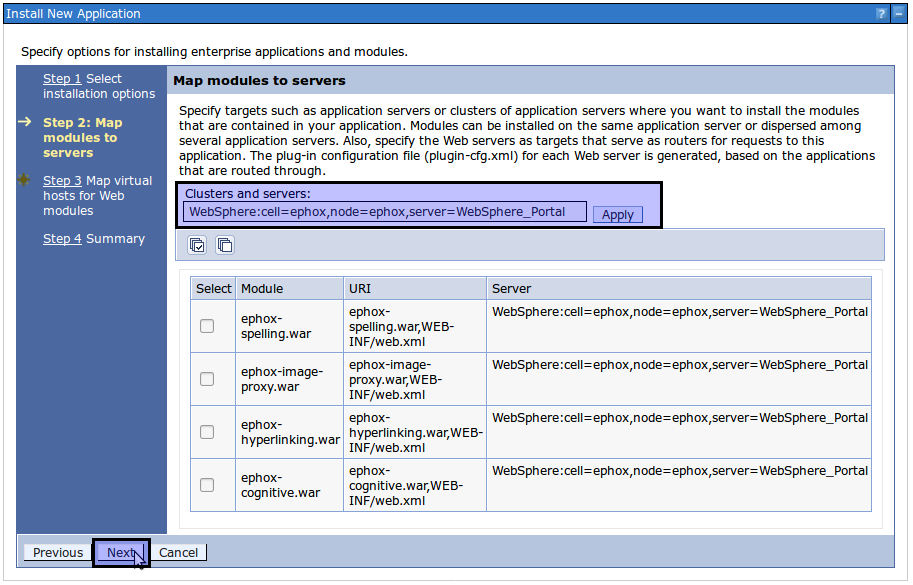
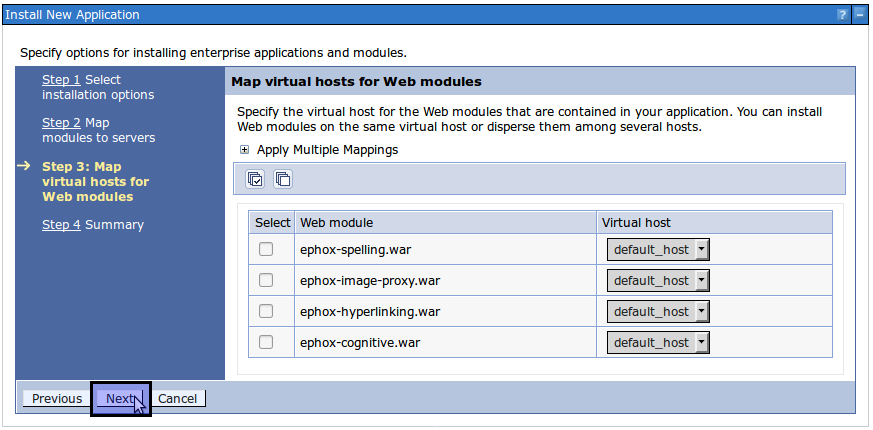
- No action is required for mapping virtual hosts for Web modules. Click "Next".
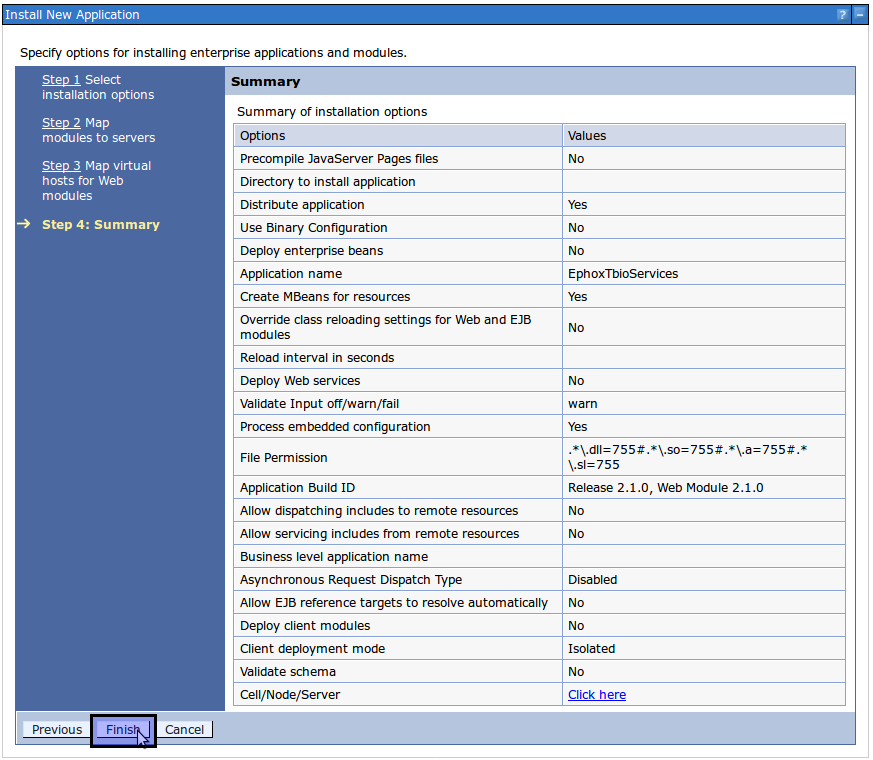
- You will be presented with a summary of installation options. Click "Finish" to install the application.
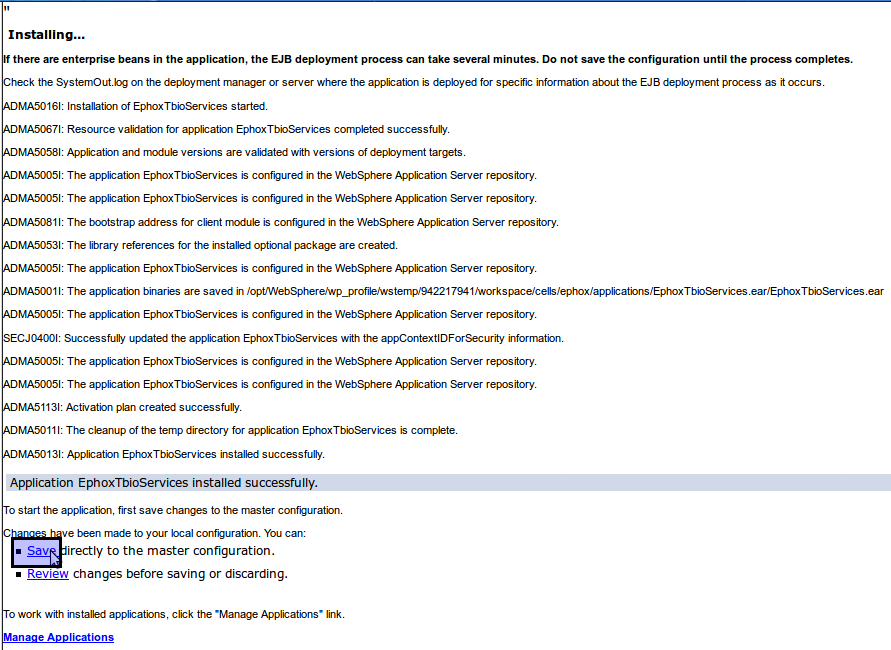
- When the installation is finished you will need to save the changes to the configuration. Click "Save".
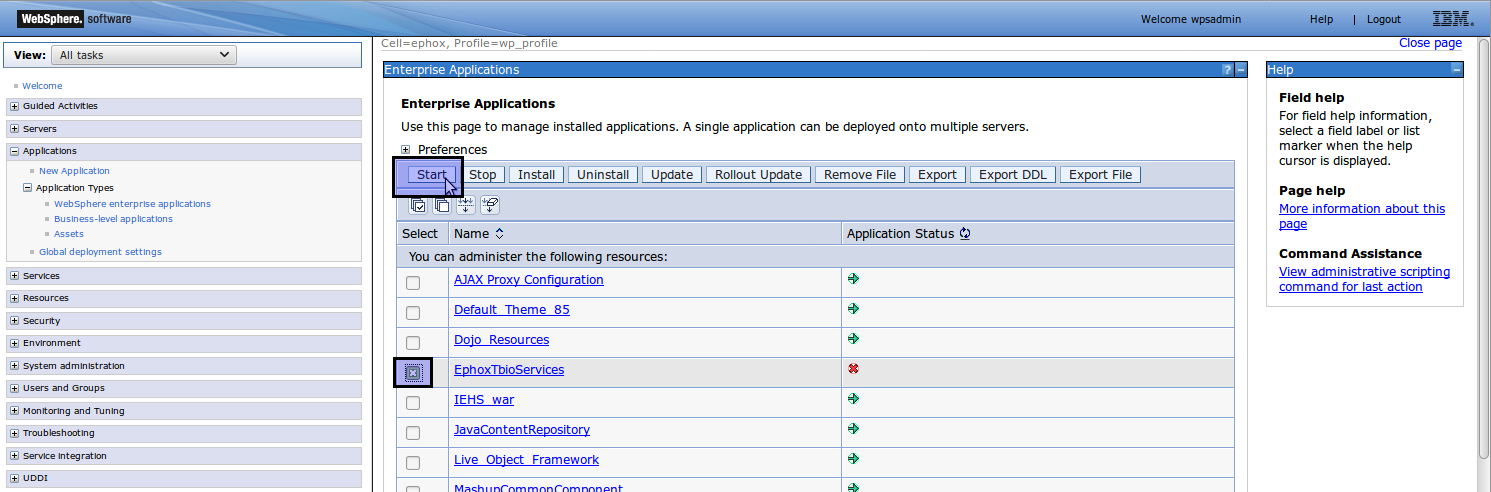
- To be able to use the Textbox.io services, they need to be started. Select "EphoxTbioServices". Click "Start".
Customize Textbox to use Tone Analyzer
Please refer to the following IBM Knowledge Center article:
https://www.ibm.com/support/knowledgecenter/SSYJ99_8.5.0/wcm/wcm_config_ephox_custom.html
Examples
Info:
For more information regarding the customization of Textbox.io, please see:
The sample configuration provided by IBM contains the following base configuration object; the relevant cognitive / isToneEnabled? snippet is towards the bottom:
...
  var config = {
    css: {
      stylesheets: styleSheetUrl ? [styleSheetUrl] : []
    },
    images: {
      editing: {
        proxy: isImageProxyEnabled ? urlImageProxyService : undefined
      },
      allowLocal: !isLimitedToLibraryImagePicker
    },
    ui: {
      locale: locale,
      toolbar: {
        items: items
      }
    },
    codeview: {
      enabled: isCodeViewEnabled
    },
    spelling: {
      url: isSpellCheckingEnabled ? urlSpellingService : undefined
    },
    links: {
      validation: {
        url: isLinkValidationEnabled ? urlLinkService : undefined
      },
      embed: {
        url: isMediaEmbedEnabled ? urlLinkService : undefined
      }
    },
    cognitive: {
      tone: {
        url: isToneEnabled ? urlToneService : undefined
      }
    },
    textboxioExtensions: [
    ]
  };
...
This base object will be used in the examples.
Once the customizations have been applied, the configuration must be installed as per IBM's documentation.
Enabling/Disabling Tone Analyzer Service Functionality
Textbox.io makes use of a server-side service to provide its Tone Analyzer service.
This feature can be enabled/disabled in the configuration using the true/false value, which is defined directly above the config object.
Tone Analyzer is disabled by default. To enable it, set isToneEnabled to true.
 // Disable/Enable services
  var isSpellCheckingEnabled = true;
  var isImageProxyEnabled = true;
  var isLinkValidationEnabled = false;
  var isMediaEmbedEnabled = false;
  var isToneEnabled = false;
Changing the value to true/false only enables/disabled the service; it does not turn the actual service on/off.
To turn the desired service on or off, please see the instructions in the service documentation.