Overview
Users can easily insert hyperlinks to a variety of content from a range of locations with-in their EditLive! content.
Displaying the Hyperlink Insertion Dialog
There are 3 basic methods for launching the hyperlink insertion dialog:
- Keyboard Shortcuts
- Toolbar Buttons
- Menu Items
Keyboard Shortcuts
You can launch the Hyperlink Insertion dialog by simultaneously pressing CTRL + K.
Toolbar Buttons
The  toolbar button opens the Hyperlink Insertion dialog.
Menu Items
The Insert Hyperlink... menu item located under the Insert menu.
Using the Hyperlink Dialog
The Hyperlink Insertion dialog has 4 distinct options for creating a hyperlink. These options are depicted in the following sections.
However, 3 fields are always editable in each section:
- Text to display - Text that will appear in the HTML as a hyperlink.
- Screen Tip - Text that will appear when a user hovers over the hyperlink in the resultant HTML.
- Address - URL the hyperlink will load.
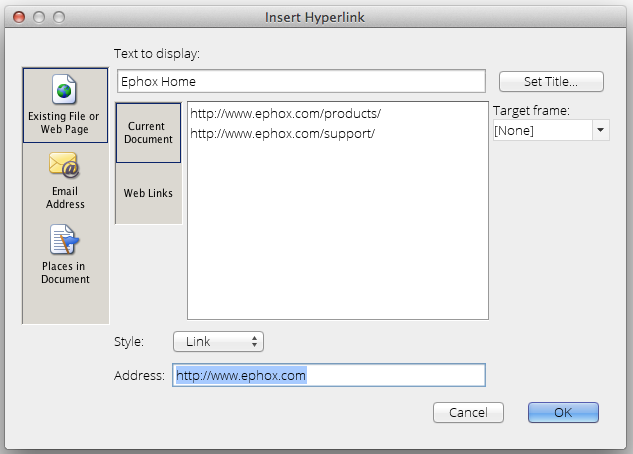
Current Document Link

From the list appearing in the middle of the dialog, you can choose to insert any hyperlink that has already been specified in your current HTML document appearing in EditLive!.
The Target Frame properties depicts how the item specified in the hyperlink will display to the user:
- None - Defaults to Same Frame (as mentioned below)
- Same Frame - The hyperlink will open the linked document, replacing the current section containing this hyperlink.
- Whole Page - When clicking this hyperlink, the entire contents of the browser window will be replaced by the linked document.
- New Window - A new browser instance will be opened, containing the linked document.
- Parent Frame - The hyperlink will open the linked document in the section wrapped around the section containing the hyperlink.
External Web Links
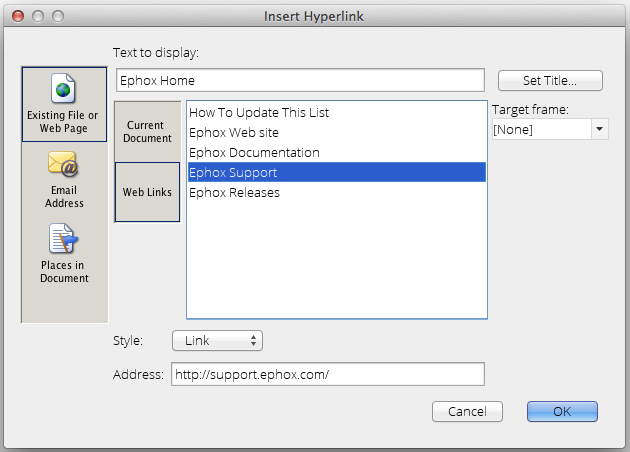
When choosing this option, a list of possible hyperlinks specified by your Systems Administrator will appear in the center of the dialog.
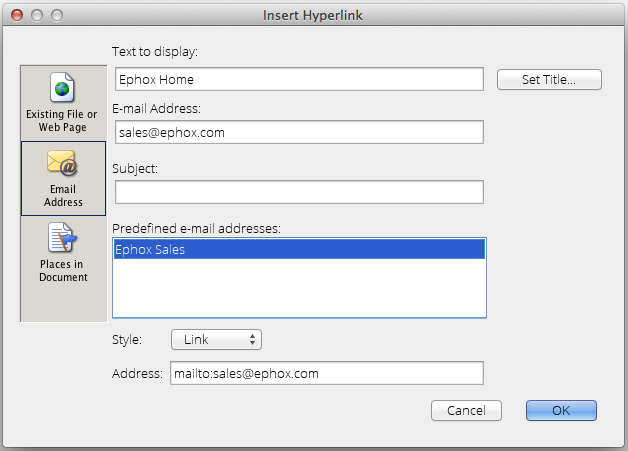
Email Address

A hyperlink can be created that points to an email address. When a user clicks this hyperlink, their default email application will load. An email draft will open in the user's email application with several values already assigned. These values automatically appearing in the email draft can be configured by using the following fields in the Tiny hyperlink dialog:
- Email Address - The email address to appear in the To field for the draft email.
- Subject - The message to appear in the Subject field for the draft email
- Predefined email addresses - The list of predefined email addresses is supplied by your Systems Administrator. Clicking on one of these items will automatically populate the Email Address field
Places in Document
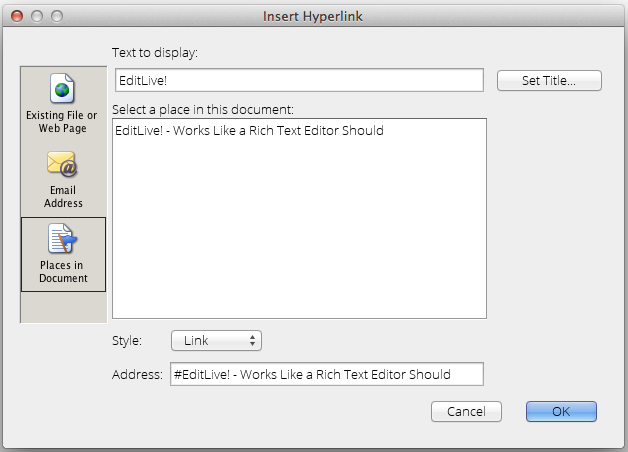
Automatically populates with heading tags and predefined bookmarks in the content. Selecting from this list creates internal hyperlinks to points with-in the document, rather than hyperlinks to completely different documents.
Creating a Hyperlink
There are two methods for creating a hyperlink:
- Highlight the text you wish to become a hyperlink. Launch the hyperlink dialog using one of the three methods mentioned above.
- Launch the hyperlink dialog. Write the text you wish to appear as the hyperlink in the Text to display field at the top of the dialog.